Bank Accounts
Manage multiple bank accounts with real-time balances and transaction visibility.
To know more click on link -
https://wpscrm.com/knowledge-base/article/bank-account-2
Bank Feeds
Automatically sync bank transactions to keep records updated and reduce manual entry.
To know more click on link -
https://wpscrm.com/knowledge-base/article/banking-rules-import-bank-transaction
Transactions
View, categorize, and manage all financial transactions in one centralized place.
Registers
Maintain detailed transaction logs for auditing and financial tracking.
Bills
Record, manage, and track payable bills with due dates and payment status.
To know more click on link -
https://wpscrm.com/knowledge-base/article/add-new-bill-and-approve
Checks
Create and manage check payments for vendors and expenses.
To know more click on link -
https://wpscrm.com/knowledge-base/article/configure-checks
Journal Entries
Manually record adjustments, corrections, and accounting entries with full control.
To know more click on link -
https://wpscrm.com/knowledge-base/article/create-a-journal-entry
Transfers
Easily move funds between accounts with proper tracking and records.
To know more click on link -
https://wpscrm.com/knowledge-base/article/record-a-transfer
Chart of Accounts
Organize all assets, liabilities, income, and expense accounts systematically.
To know more click on link -
https://wpscrm.com/knowledge-base/article/chart-of-accounts
Account Details & Types
Define account categories, types, and behaviors to ensure accurate reporting.
To know more click on link -
https://wpscrm.com/knowledge-base/article/account-detail-types
Reconcile
Match bank statements with recorded transactions to ensure accuracy and prevent errors.
To know more click on link -
https://wpscrm.com/knowledge-base/article/reconcile-an-account
Budgets
Create and monitor budgets to control spending and plan finances effectively.
To know more click on link -
https://wpscrm.com/knowledge-base/article/create-a-budget
Vendor Management
Store vendor details, track bills, payments, and outstanding balances efficiently.
To know more click on link -
https://wpscrm.com/knowledge-base/article/add-a-vendor
General Settings
Configure accounting preferences, fiscal year, and default behaviors.
To know more click on link -
https://wpscrm.com/knowledge-base/article/general-accounting-settings
Banking Rules
Automate transaction categorization using custom banking rules.
To know more click on link -
https://wpscrm.com/knowledge-base/article/banking-rules-import-bank-transaction
Mapping Setup
Map bank transactions to the correct accounts for accurate posting.
To know more click on link -
https://wpscrm.com/knowledge-base/article/mapping-setup
Plaid Environment
Securely connect banks using Plaid for reliable and encrypted data synchronization.
To know more click on link -
https://wpscrm.com/knowledge-base/article/plaid-environment-setup-your-bank-account
Income Statement Modification
Customize income statement formats to match business reporting needs.
To know more click on link -
https://wpscrm.com/knowledge-base/article/income-statement-modification-2
Currency Rates
Manage multi-currency transactions with automatic exchange rate updates.
2.ACCOUNTING DETAIL FOR FUTURE
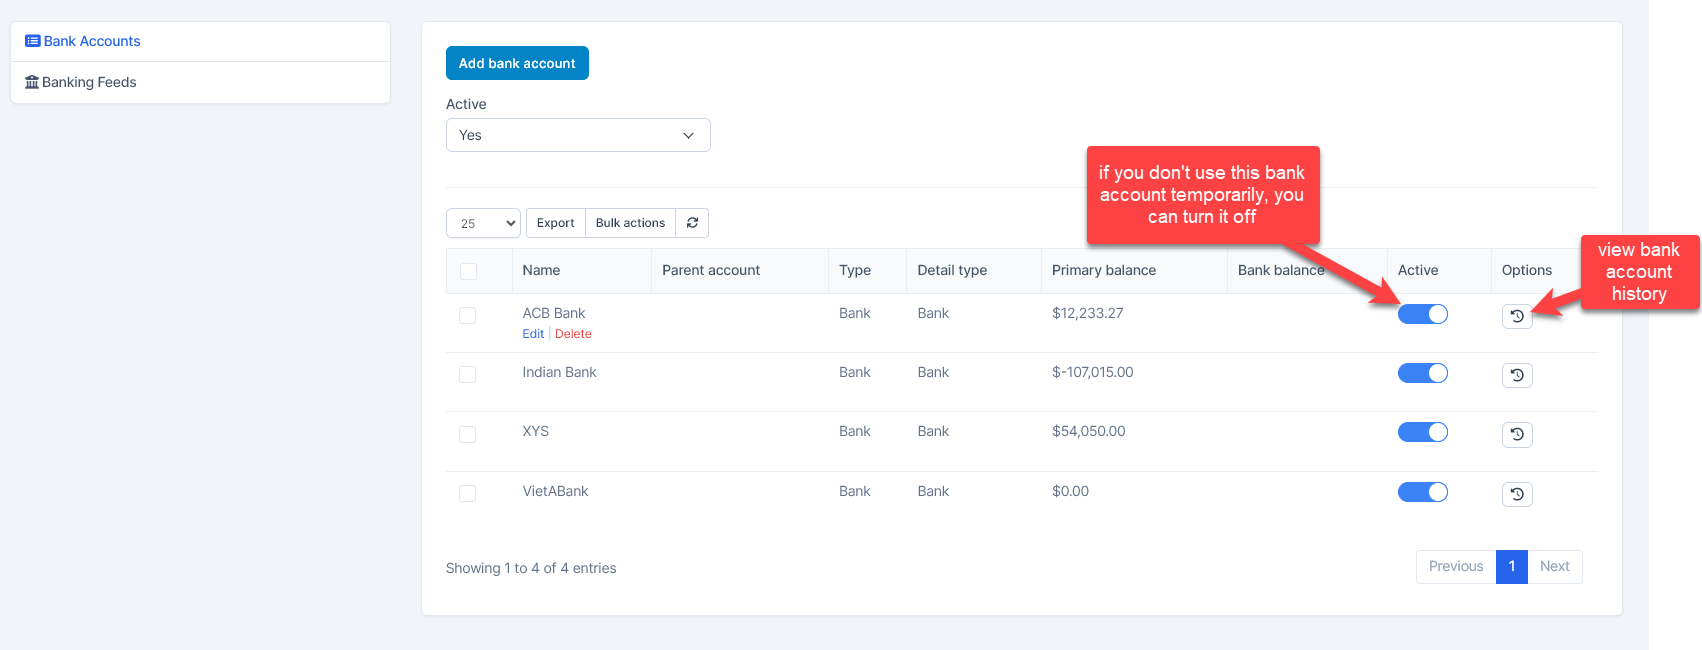
1. Bank Account
Used to manage and create the bank accounts.
Bank account list
Create bank account
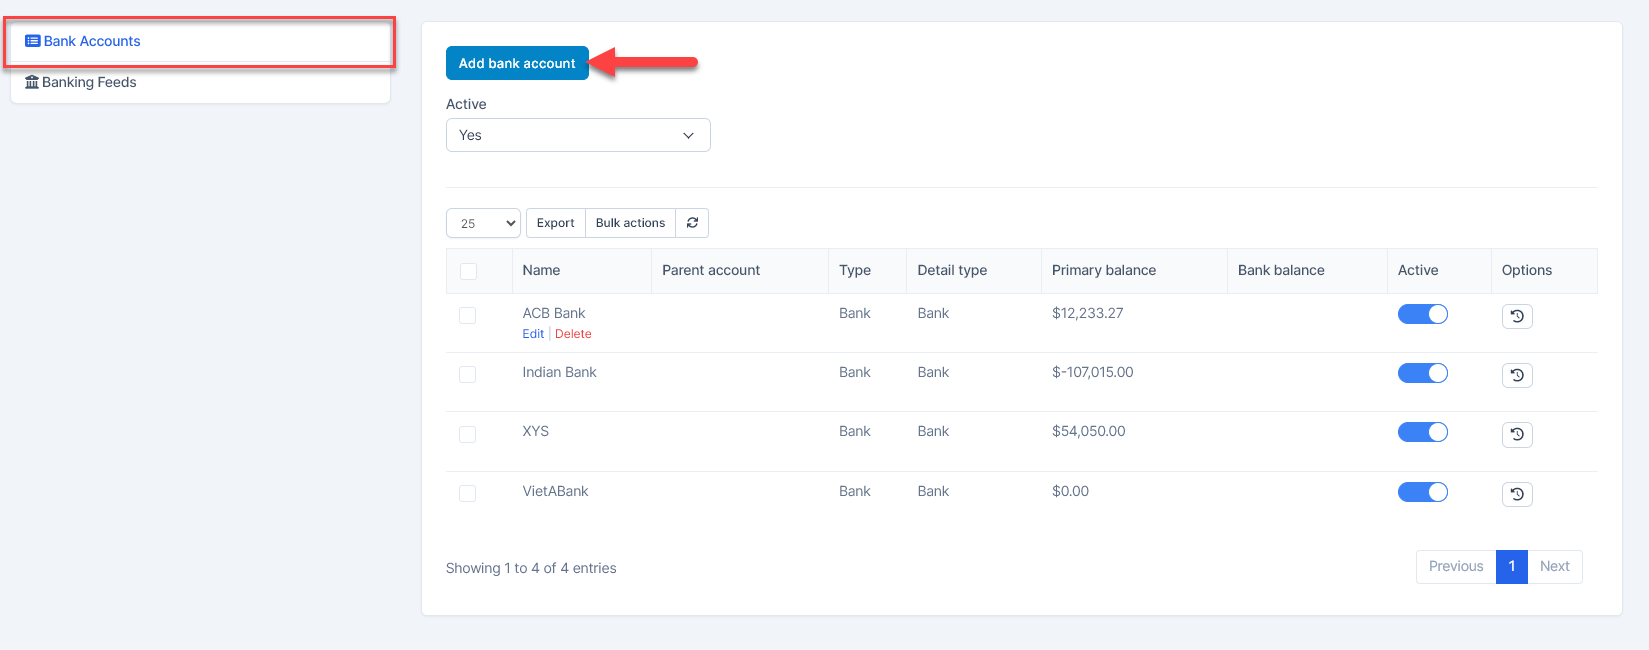
- Step 1. Go to the Banking menu under the Accounting module in the left sidebar -> Select the Bank Accounts menu
- Step 2. Click on the Add bank accounts button
- Step 3. In the Account popup, fill in the following detail
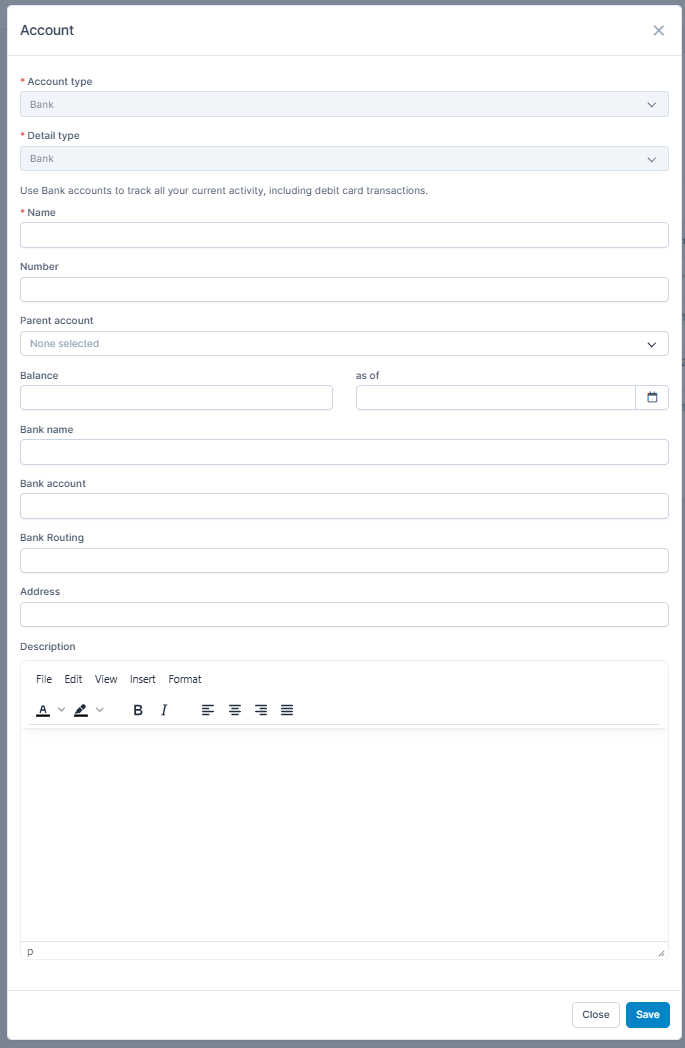
- Account type: For bank accounts, the type is automatically set to Bank and cannot be changed
2. Detail type: Default is set to Bank and cannot be changed
3. Name: Enter a descriptive name for the bank account.
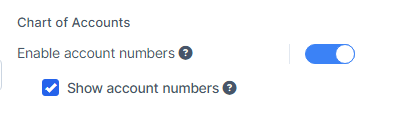
4. Number: This field is only visible if you have enabled the option "Enable Account Numbers" in the General settings.
5. Parent account (Optional): Select a parent account if you wish to organize this account hierarchically.
6. Balance and as of (Optional): Enter the initial balance and the applicable date.
7. Bank name: Specify the name of the bank where the account is held.
8. Bank account: Input the account number provided by your bank.
9. Bank Routing: Enter the routing number associated with your bank.
10. Address: Provide the bank's address or the branch location.
11. Description: (Optional): Add any additional information or notes about the bank account.
Note: If you wish to assign a specific number to the bank account and have it displayed across the Banking, Reports, and Transactions pages, ensure that the Enable Account Numbers and Show Account Numbers options are activated in the general accounting settings.
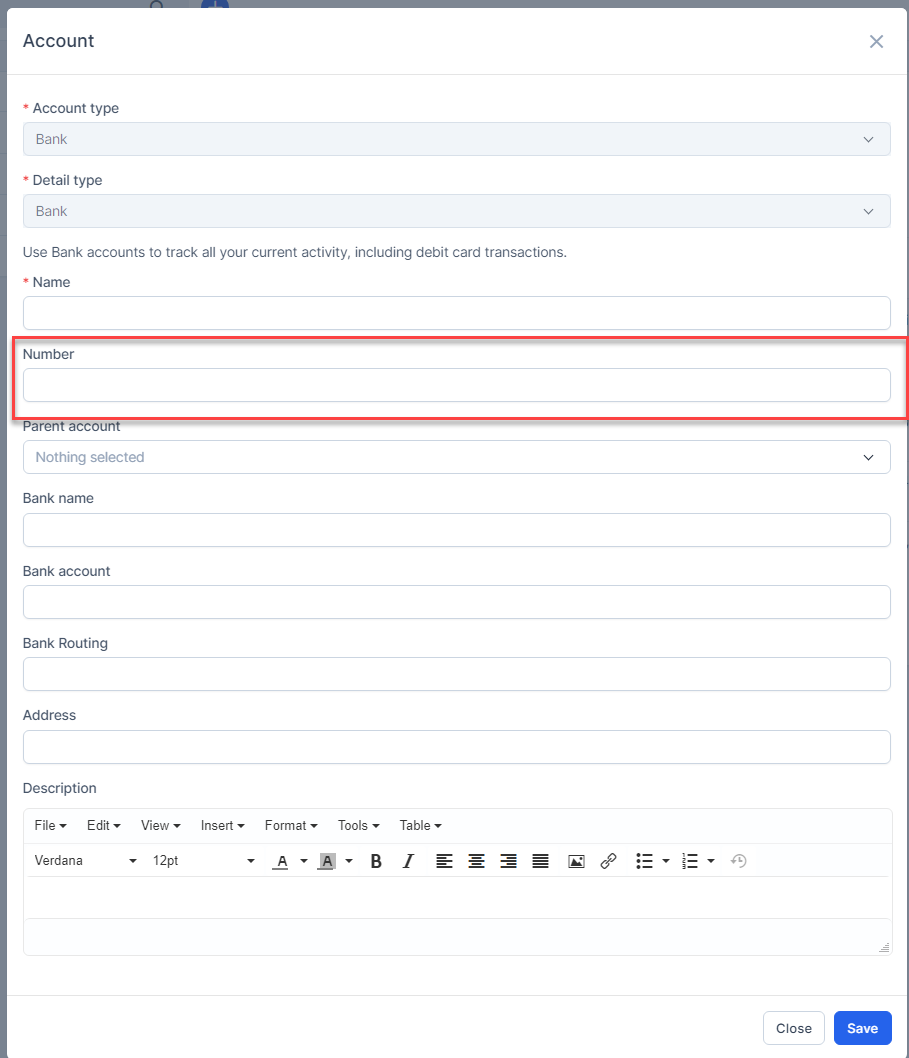
- Step 4. Click on the Save button
Delete bank account
Please be aware that only bank accounts without any associated transactions can be deleted. If a bank account has existing transactions, those must be removed or reassigned before the account can be deleted.
2. Transactions
View, categorize, and manage all financial transactions in one centralized place.
You can view all the transactions related to Sales, Expenses and Inventory In transactions section.
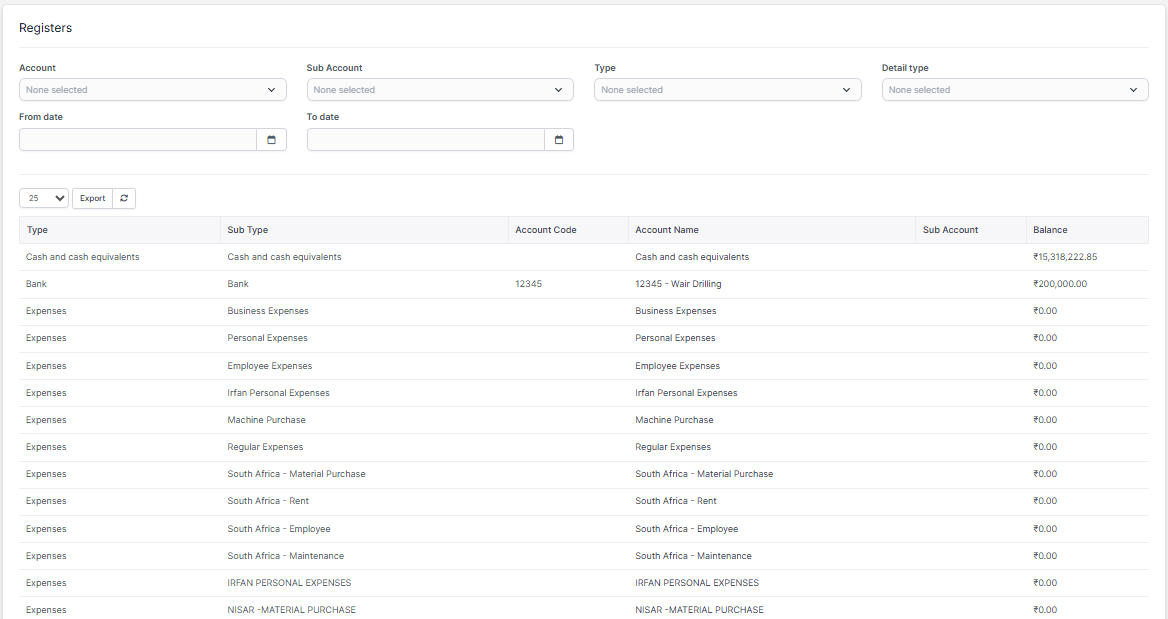
3. Registers
Maintain detailed transaction logs for auditing and financial tracking.
In registers we can see all the transaction logs of accounts and financial tracking can be done.
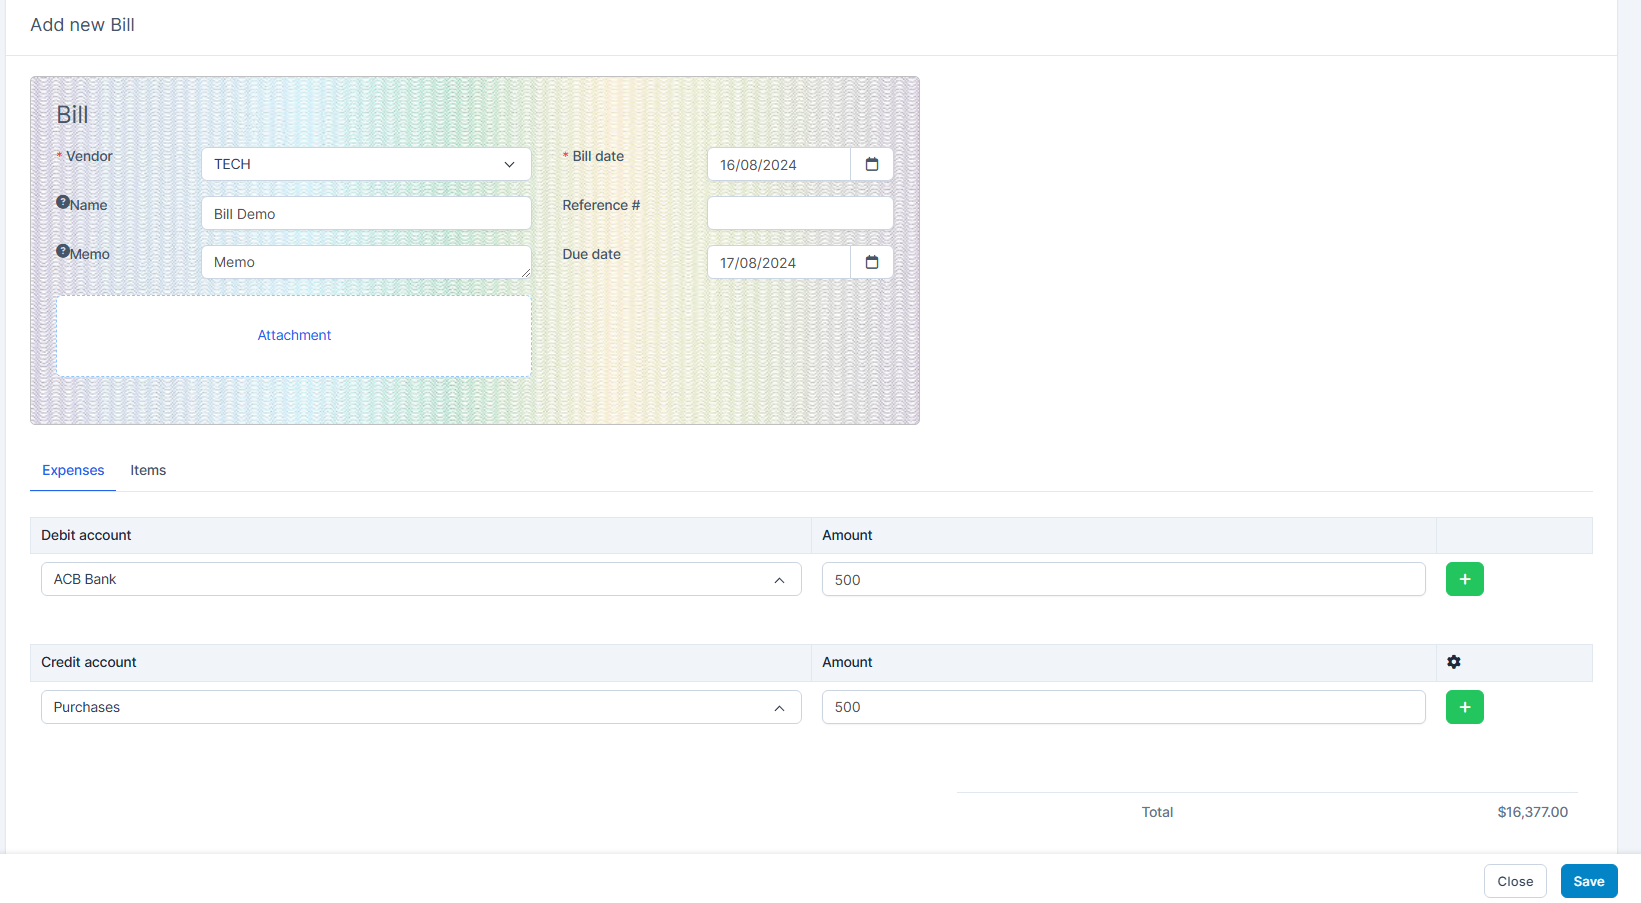
4. Bills
Add New Bill
- Step 1. Go to Bills menu under the Accounting module
- Step 2. Select the Add New Bill function
- Step 3. Enter Basic Bill Information
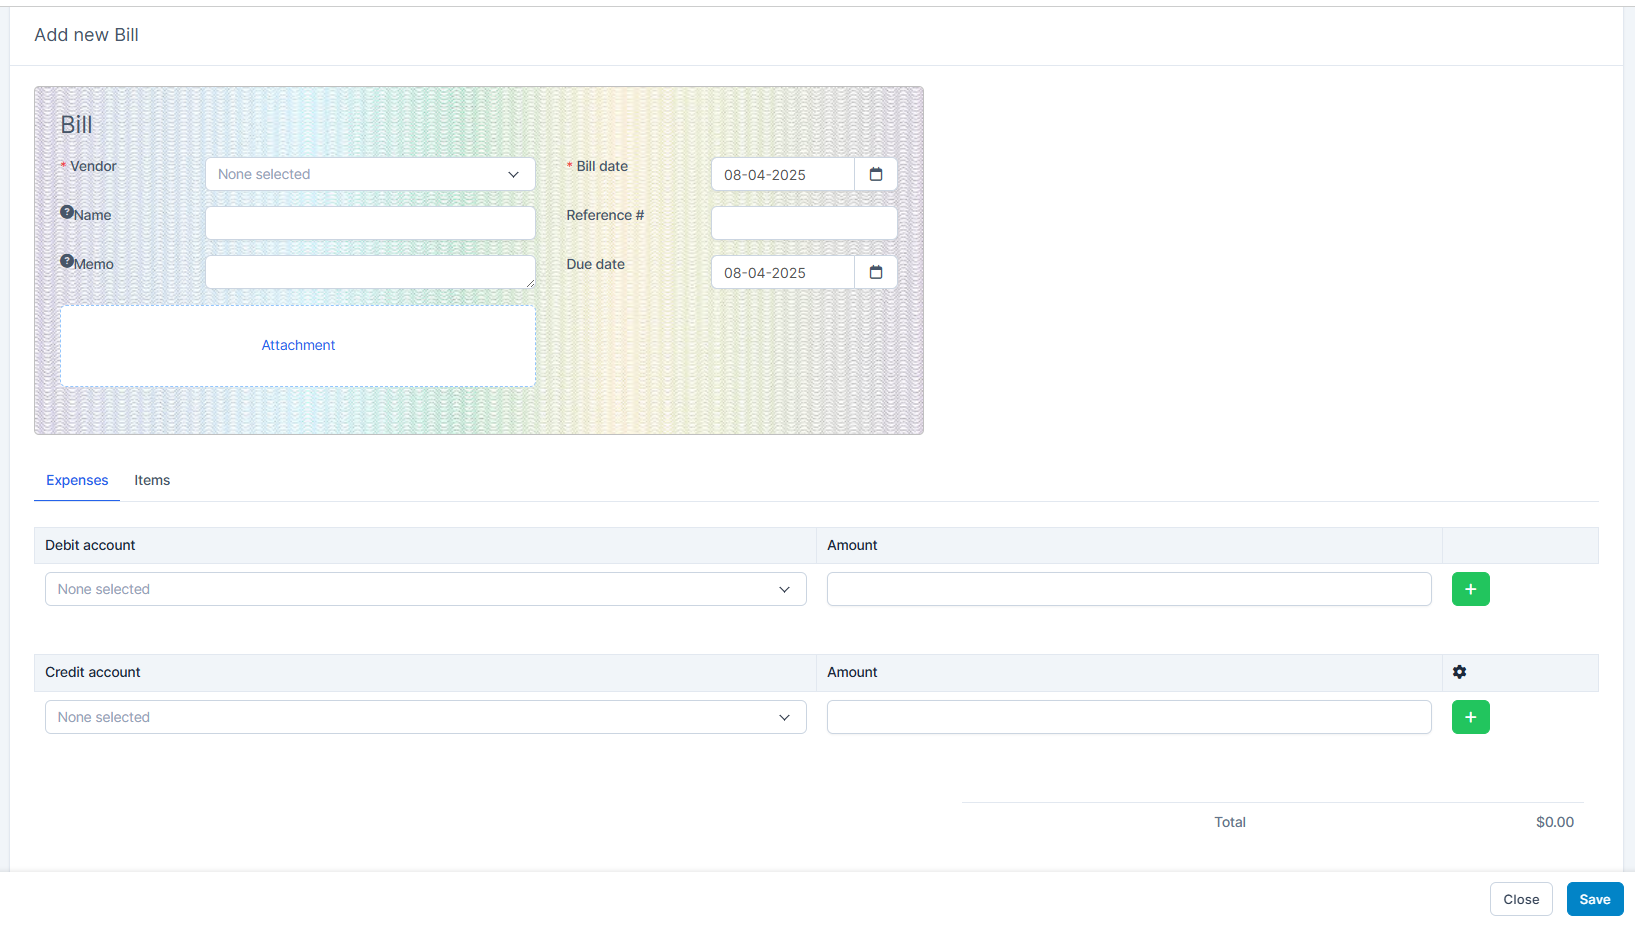
- - Vendor: Select the vendor from the dropdown list.
- Name: Enter the title or reference name for the bill (e.g., Bill Demo).
- Memo: Add any notes or descriptions related to the bill.
- Bill Date: Select the date when the bill was issued.
- Due Date: Select the date by which the bill should be paid.
- Reference #: (Optional) Enter the vendor’s reference number.
- Attachment: Upload one file of the invoice or relevant document (PDF, image, etc.). - At Expenses tab, you need select the Debit account and Credit account, enter the Amount

- - Debit Account: Select the account to be debited (e.g., Expense, Marketing).
- Credit Account: Select the account to be credited (e.g., ACB Bank, Accounts Payable).
- Amount: Enter the expense amount.
Note: total debit amount equals total credit amount - At Items tab, you select available items

- - Item: Select the product or service from the item list.
- Description: (Optional) Add details about the item.
- Qty: Enter the quantity purchased.
- Cost: Enter the unit cost of the item.
- Amount: This is auto-calculated as Qty × Cost. - Step 4. Review Total
The Total is the sum of values entered in both Expenses and Items tabs. - Step 5. When you're done, select Save
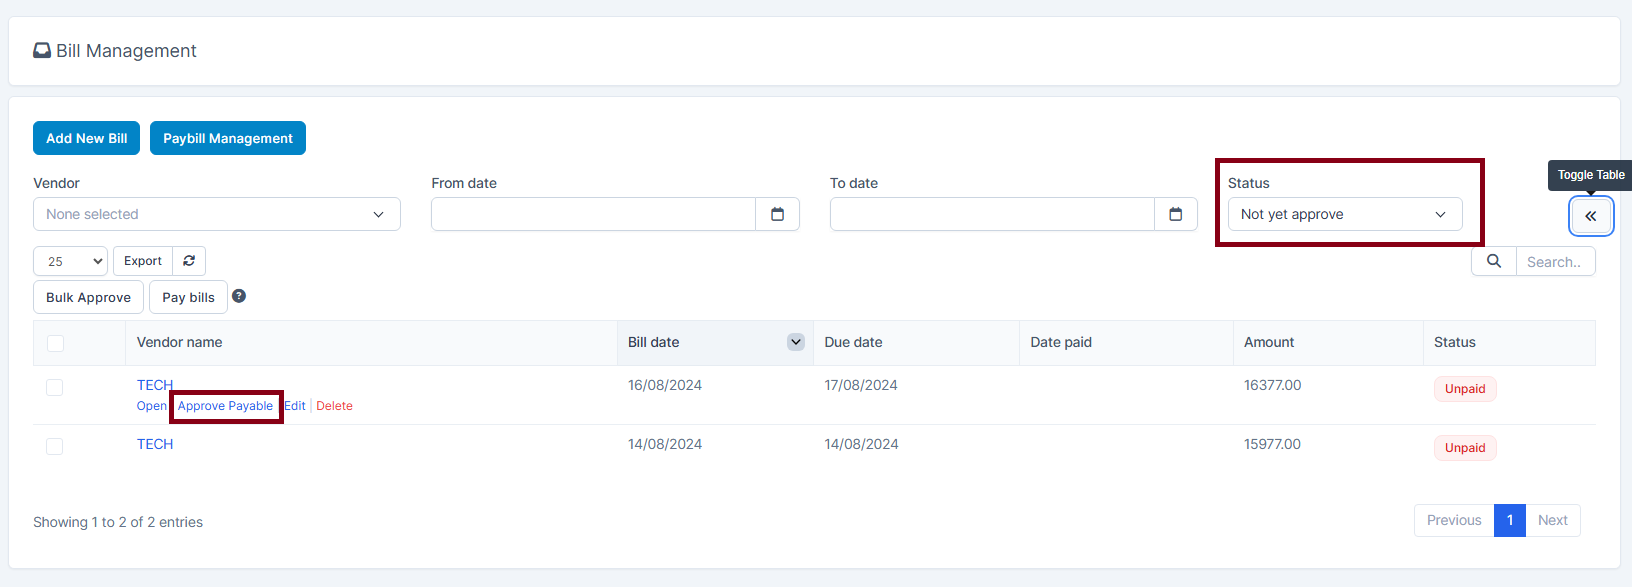
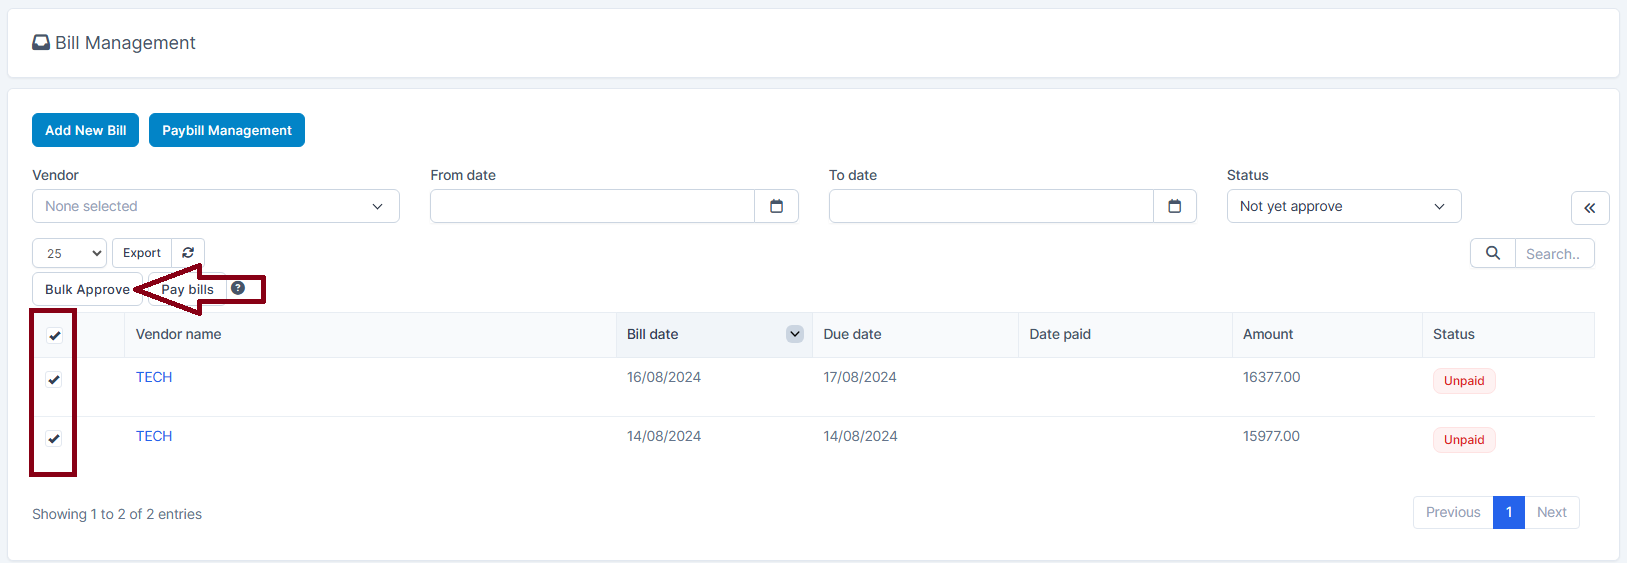
Approve or Bulk Approve
Next we proceed to approve the bill. Approved bills cannot be edited anymore
- Filter status according to "Not yet Approve" -> select a bill and click Approve Payable
- Or select some bill and click on the Bulk Approve
Filter status by Approved to see approved bills
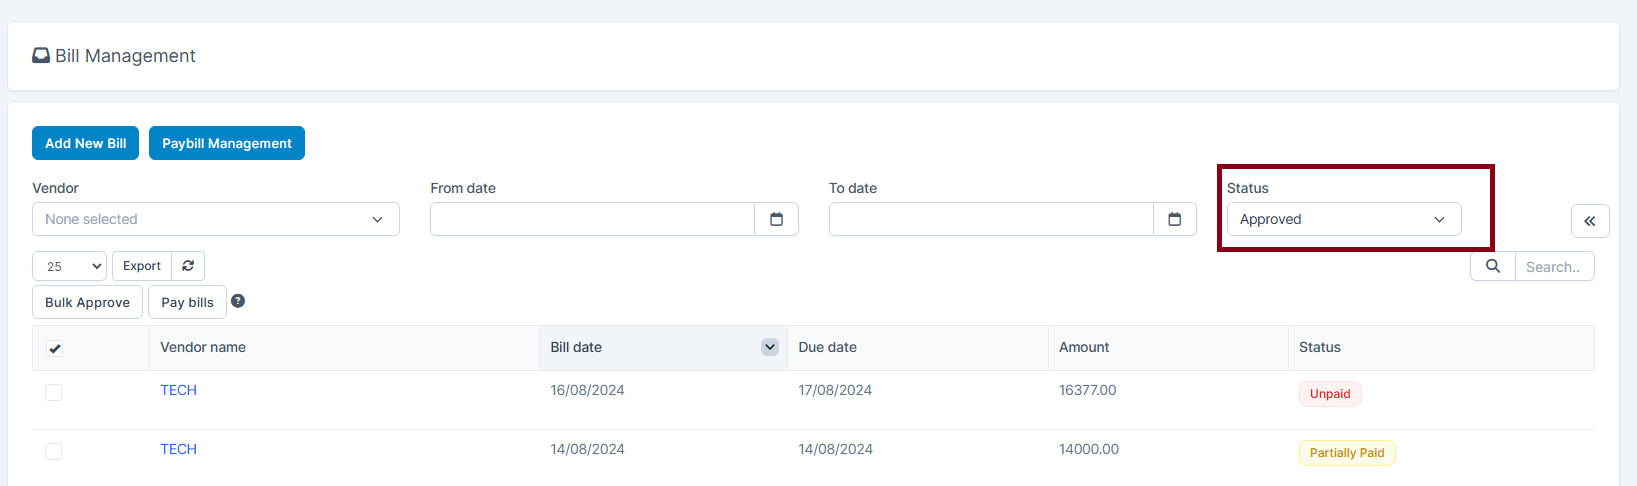
The expenses section in the bill will map to the selected accounts.
The items in the bill will be mapped according to account pairs of expense default mapping in Mapping setup.

If the item in the bill meets the conditions of the item mapping setup in Mapping setup, the account selected in the "Deposit to" field in the image above will be replaced by the account selected in the "Expense account" field as shown below.

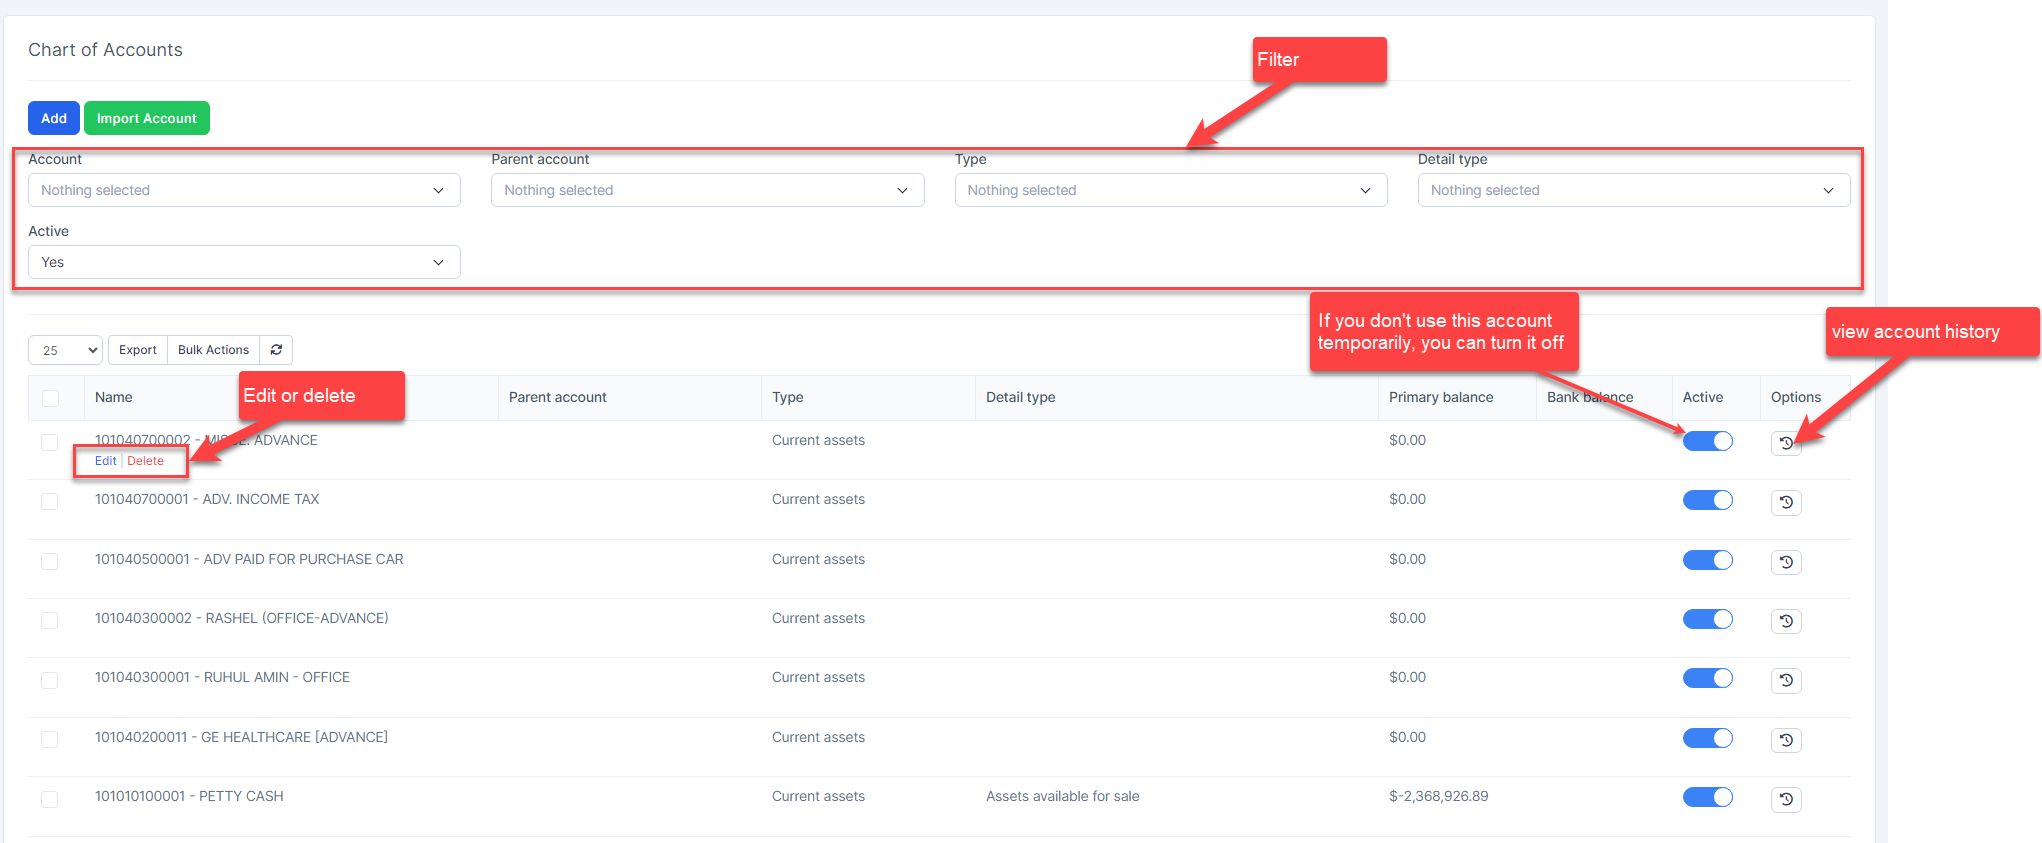
5. Chart Of Accounts
Account list
Create a new account
- Step 1. Go to Chart of Account menu under the Accounting module in the left sidebar
- Step 2. Click on the Add button
- Step 3. In the Account popup, fill in the following detail
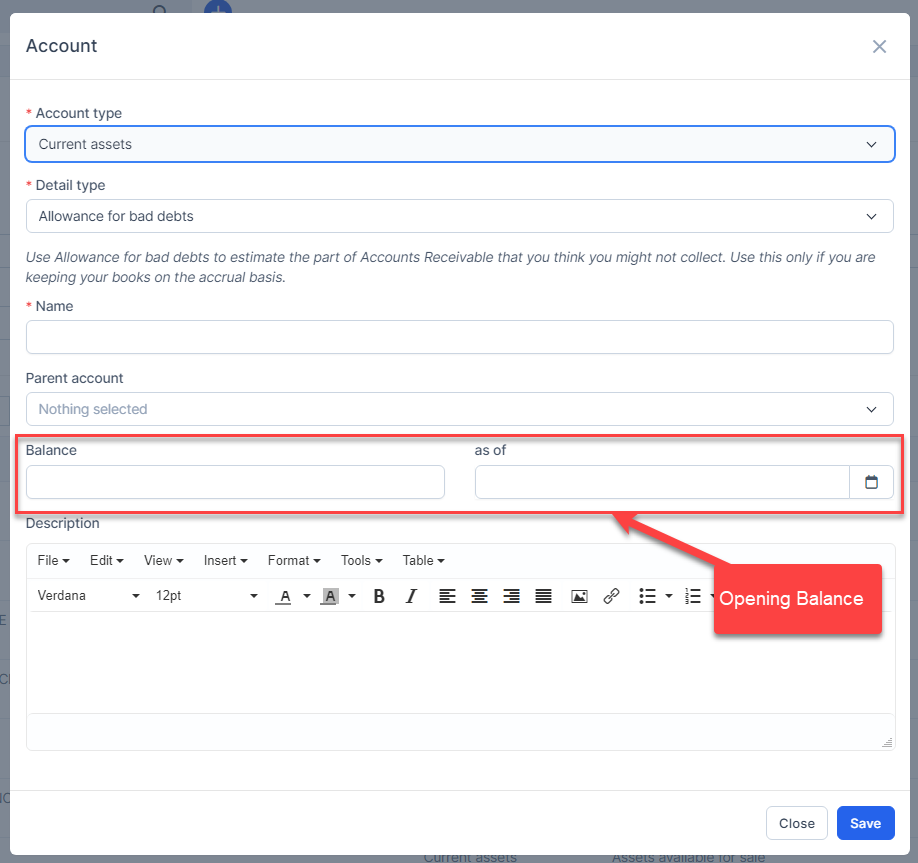
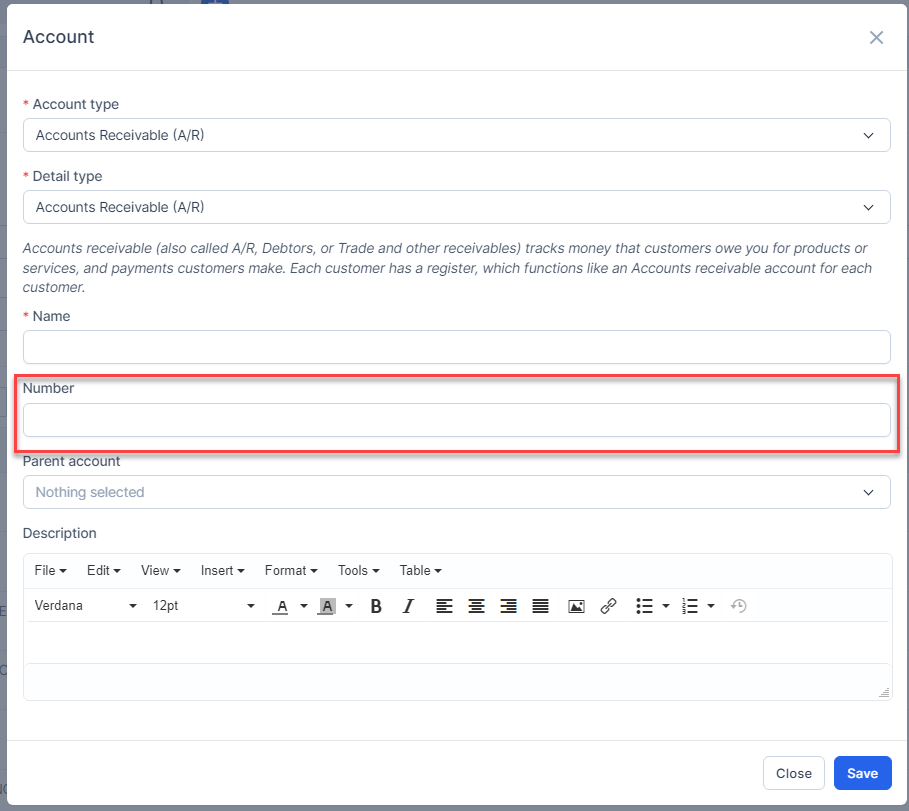
- Account type: Select the appropriate account type from the dropdown list.
2. Detail type. Choose the specific detail type for the account. You can add new detail types in the Account Detail Type settings.
3. Account name: Enter a descriptive name for the account.
4. Parent account (optional): Choose a parent account if you want to create a hierarchical structure.
5. Opening Balance and as of Date (Optional). Enter the initial balance and the applicable date. This field only appears for certain specialized account types, such as: Curent assets, Cash and cash equivalents, Fixed assets, Non-curent assets, Credit Card, Current liabilities, Non-current liabilities, Owner's Equity.
6. Description (optional): Enter a brief description of the account's purpose or contents.
Note: If you want to use account numbers and display them on the chart of accounts, reports, and transaction screens, enable the options Enable account numbers and Show account numbers in settings.

- Step 4. Click on the Save button
Delete account
Only accounts that are not the default account and have no related transactions can be successfully deleted.
Import account
-
- Step 1. Click on the Import Account button
- Step 2. To ensure successful import (correct format, full columns) you should download the template file by clicking Download the template button
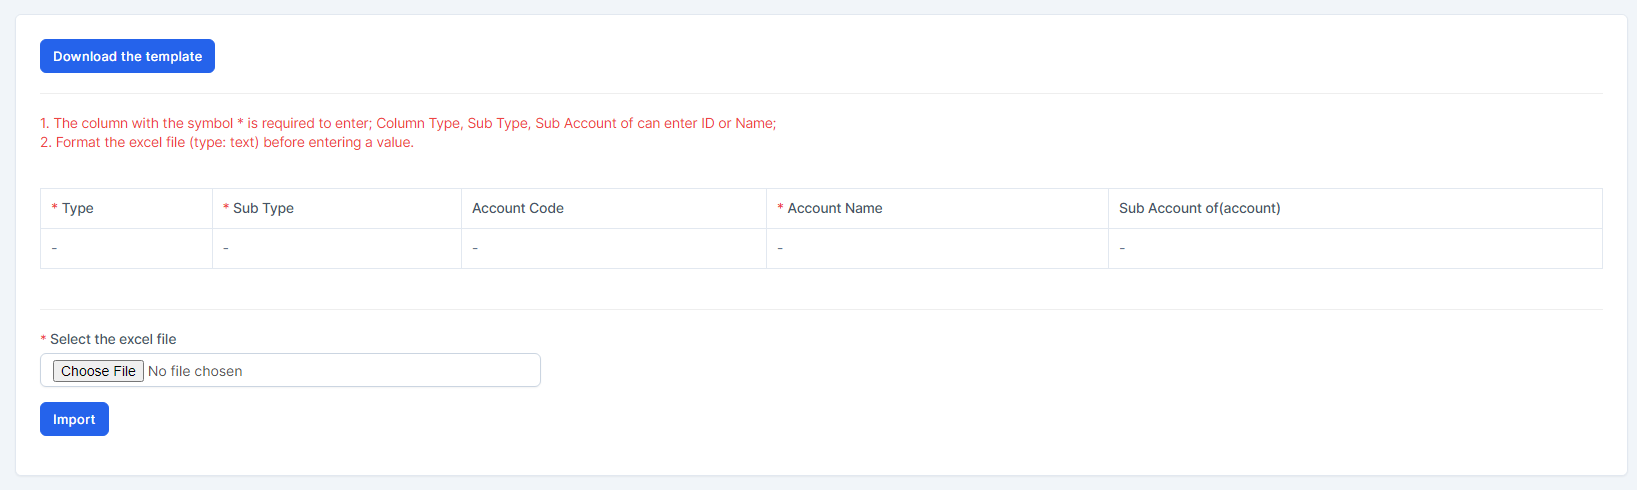
- Step 3. Enter the data you need to import into the downloaded file and save it.
- Step 4. Click the Choose File button under Select the excel file and choose a file -> click on the Import button


- In case the import fails, the Download error file button will be displayed. To see the import error, click Download error file to download this file and see the error.
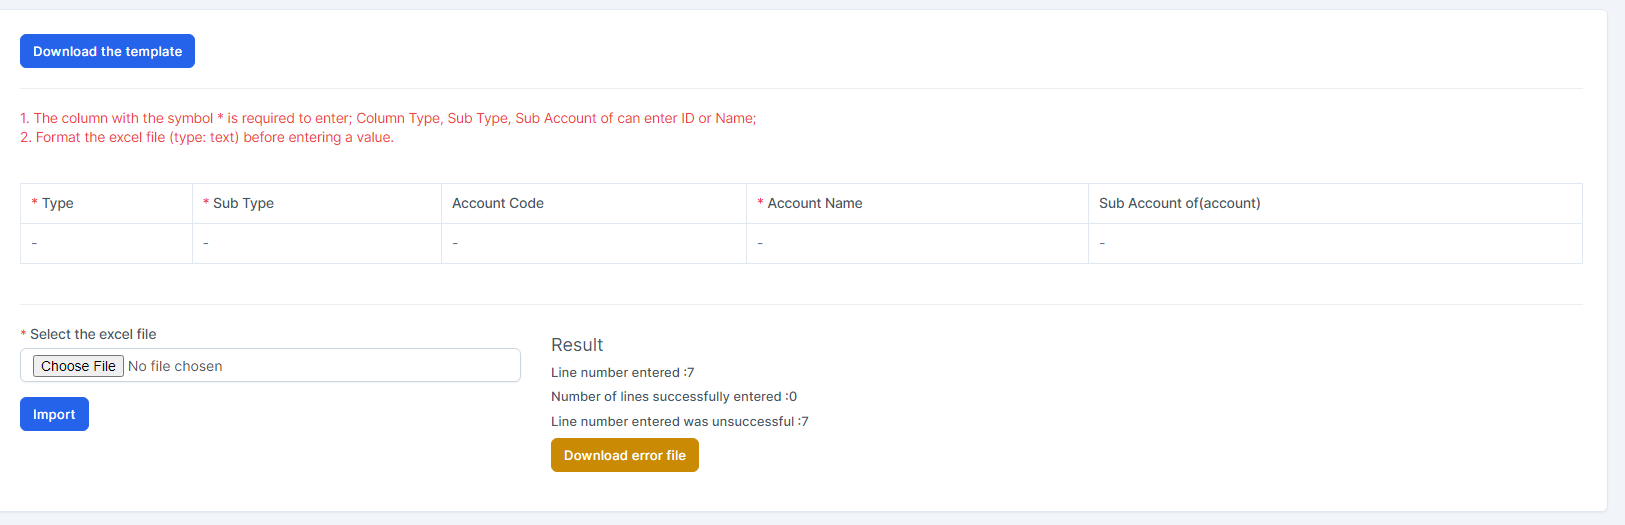
- => Then go to the last column in the file (Error column) to see the exact error that caused the import of the item to fail

- In case the import fails, the Download error file button will be displayed. To see the import error, click Download error file to download this file and see the error.
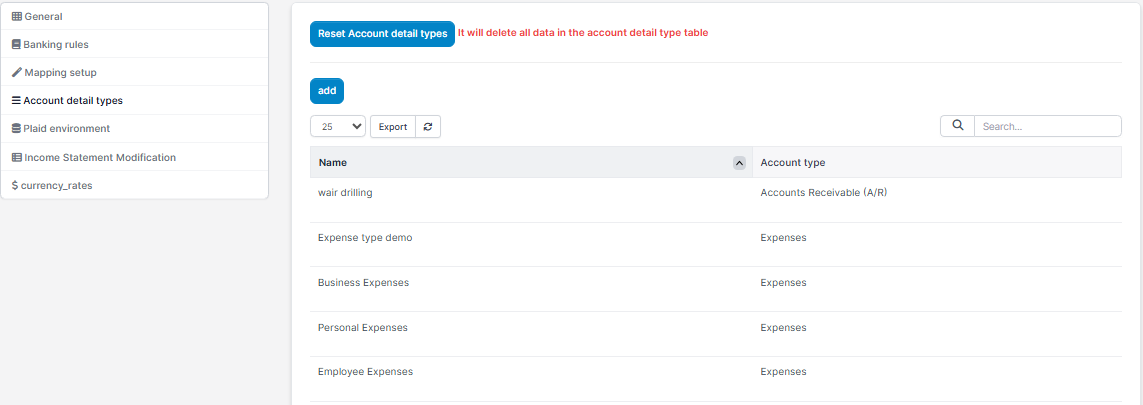
6. Account Detail Types
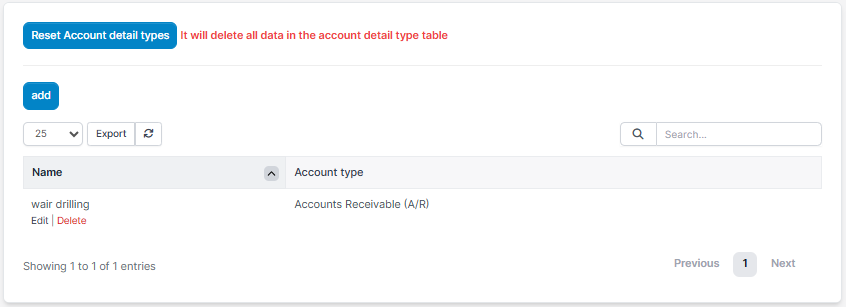
Go to the Setting menu under the Accounting module in the left sidebar -> Select the Account detail types menu.
Used to add a detail type that is not available in the system. This detail type is used to create an account.

Reset Account detail type: Delete all detail types in this screen but accounts of this detail type are not deleted.
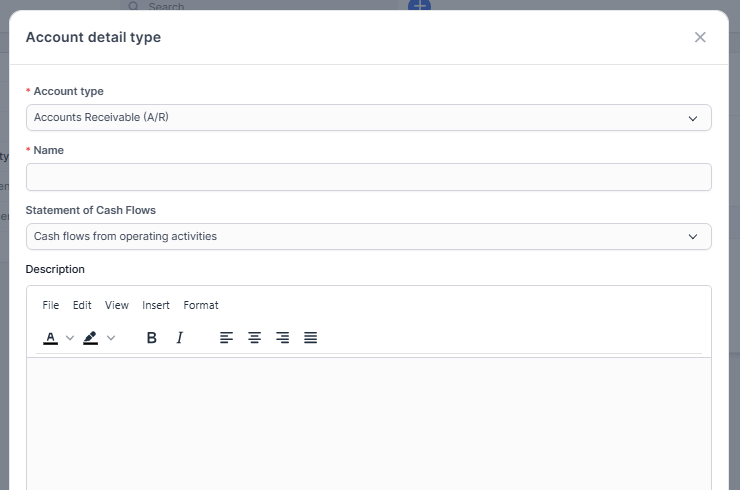
Create account detail type
To add a new account detail type to your organization:
- Step 1. Click on the Add button.

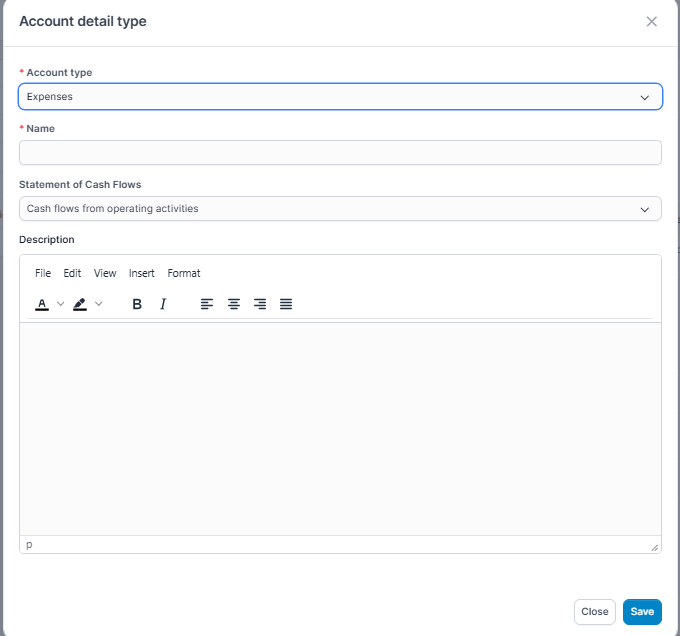
- Step 2. In the Account detail type page, fill in the following details:
-
- Account type: Select the Account type that this detail type will belong to
- Name: name of the new detail type. This will be used to identify the detail type when creating or managing accounts
- Statement of Cash Flows: used to select where this account type should be displayed in the Statement of Cash Flows report. This helps categorize the account in financial reports
Cash flows from operating activities (CFO): shows the amount of money the company brings in from business activities such as manufacturing and sales. This is the first part of the Statement of Cash Flows Report
Cash flows from investing activities (CFI): money generated or expensed from investment-related activities such as buying assets and supplies, investing in securities or selling securities or asset.
Cash flows from financing activities (CFF): shows the net cash flows used to finance the company. Financial activities include transactions involving debt, equity, and dividends.
Cash and cash equivalents at beginning of year (CCE): includes cash, bank accounts and marketable securities. - Description: A brief explanation of the account detail type’s purpose. This helps other users understand its usage and when to select it. The description can include examples of use cases or typical transactions.
- Step 3. Click Save button
Delete account detail type
You cannot delete an account detail type if any account is currently using it.
If you want to delete an account detail type, please follow these steps:
1. Identify all accounts that are using this detail type.
2. Delete or update those accounts to use a different detail type.
3. Once no account is linked to the detail type, you will be able to delete it.
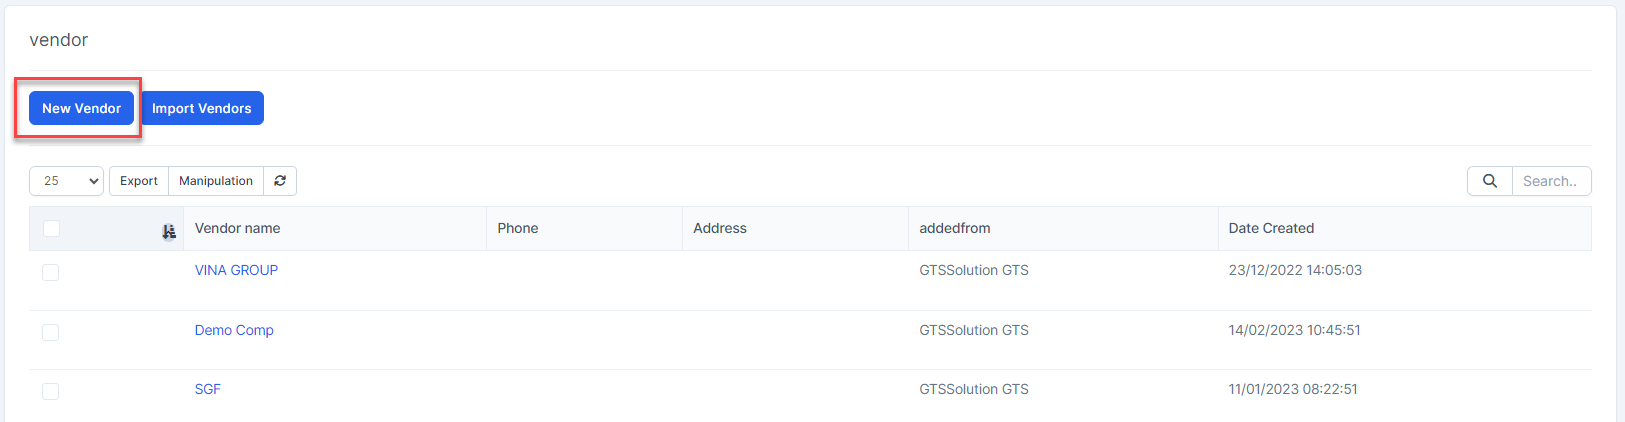
7. Vendors
Vendors are people or companies that you owe money to or subcontractors that work for you. If you are using the Purchase module, add a supplier at the Purchase module. If you do not use the Purchase module, the Supplier menu will be displayed in the Accounting module. Vendor is used for the Bill feature.
Create Vendor
To create a new vendor:
- Step 1. Go to the Accounting module in the left sidebar and select Vendor menu
- Step 2. Click the New Vendor button
Step 3. Complete the fields in the Vendor information window
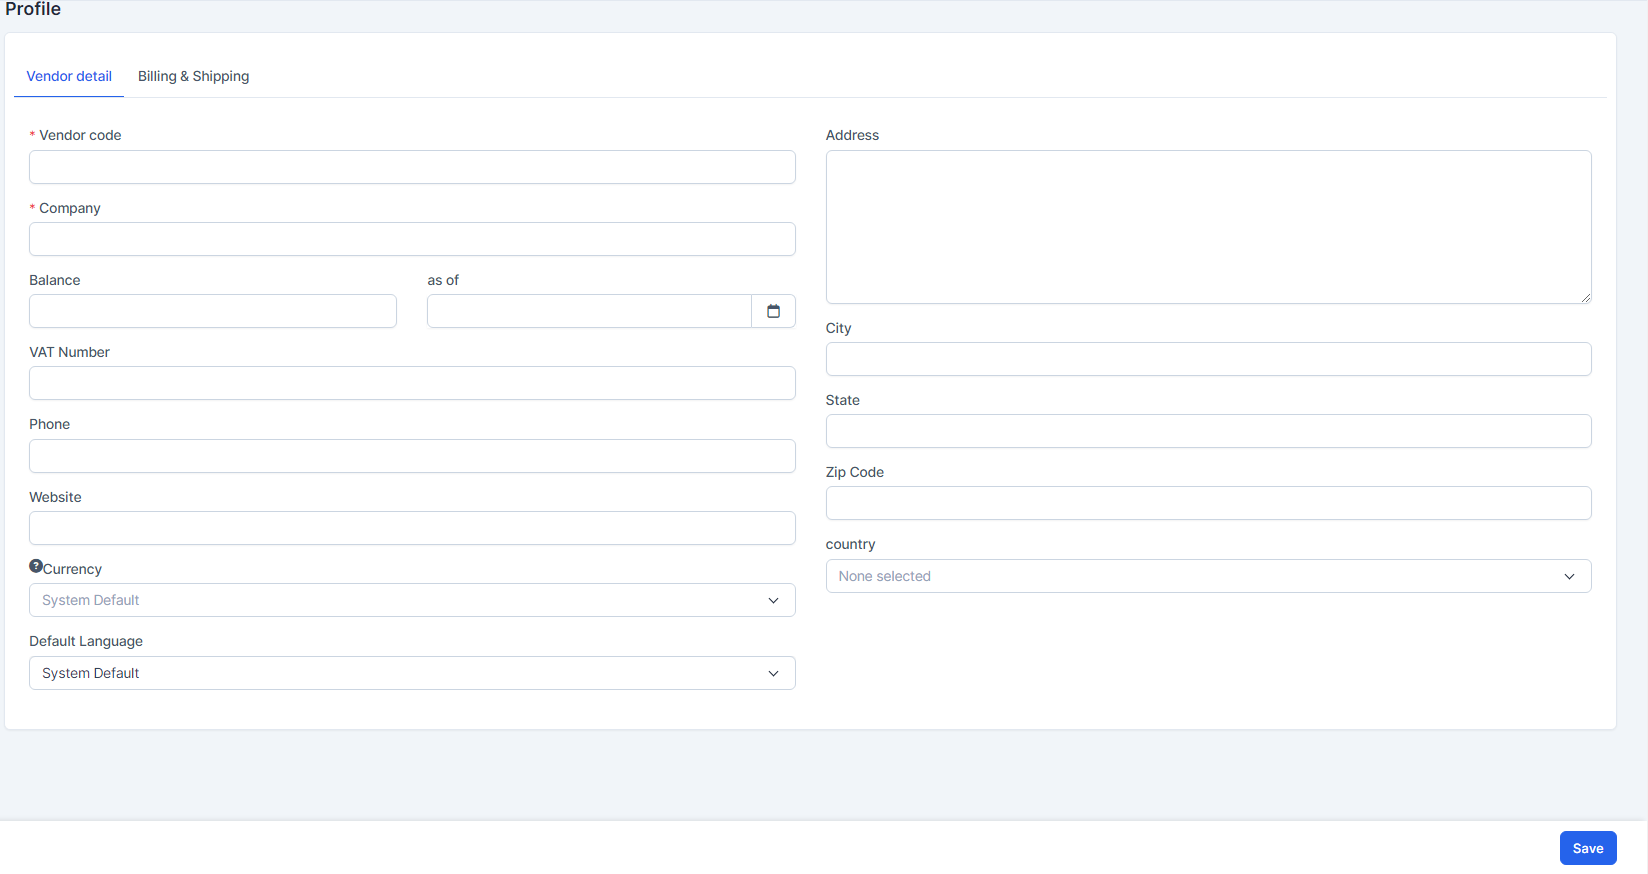
Tab 1: Vendor Detail
- Vendor Code: A unique identifier for the vendor (required).
- Company: Name of the vendor's company (required).
- Balance: Current outstanding balance for the vendor.
- As of: The date on which the balance is applicable.
When you enter balance and as of, the system will automatically create a bill in the Accounting module / Bills menu and this bill will be automatically approved and mapped to the account pair Other selling expenses and Accounts Payable (A/P).
- VAT Number: Vendor’s tax identification number (if applicable).
- Phone: Contact phone number of the vendor.
- Website: Official website URL of the vendor.
- Address: Main address of the vendor.
- City: City of the vendor’s address.
- State: State or province of the vendor’s address.
- Zip Code: Postal or ZIP code.
- Country: Country of the vendor.
- Currency: Preferred currency for transactions (if not selected, system default is used).
- Default Language: Preferred language for communication with this vendor.

Tab 2: Billing & Shipping
Billing Addres:
- Street: Street name and number for the billing address.
- City: City where the invoice should be sent.
- State: State or province of the billing address.
- Zip Code: ZIP or postal code of the billing location.
- Country: Country where the vendor is billed.
- Same as Vendor Info: Click "Same as Vendor Info" if you want to copy the content of Street, City, State, Zip Code, Country from Vendor detail tab to Billing Address.
Shipping Address:
- Street: Street name and number for the delivery address.
- City: City where goods will be delivered.
- State: State or province of the delivery location.
- Zip Code: ZIP or postal code for the delivery address.
- Country: Country for the shipping destination.
- Copy Billing Address: click "Copy Billing Address" if you want to copy the content of Street, City, State, Zip Code, Country from Billing Address to Shipping Address.
- Step 4. Click Save
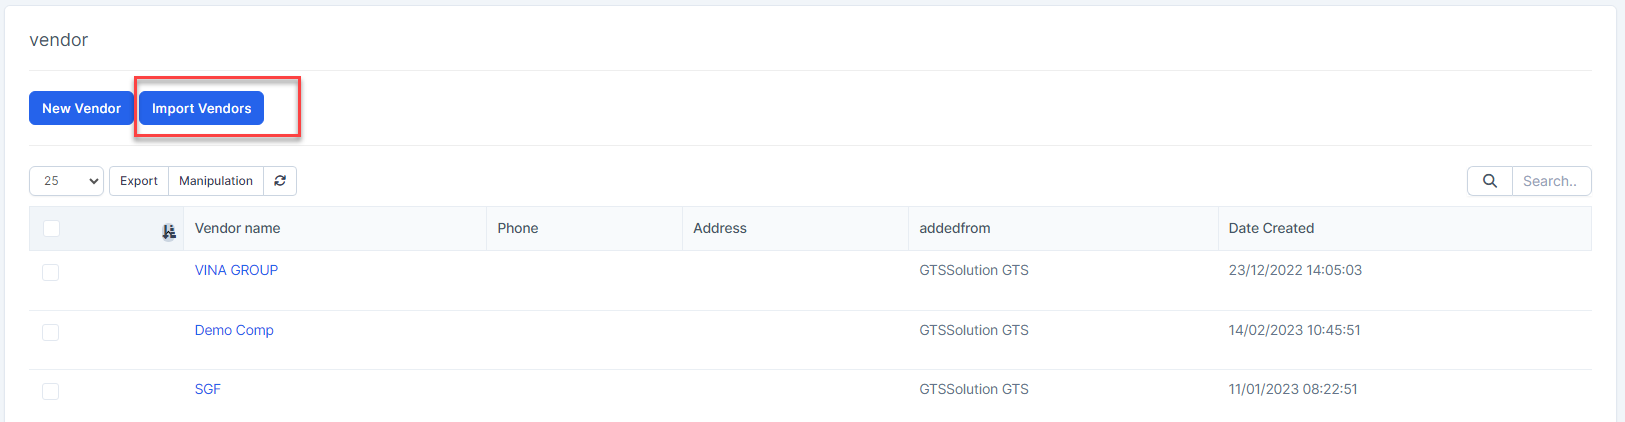
Import Vendor
To import vendor from other systems:
- Step 1. Click Import Vendors button
Step 2. To ensure successful import (correct format, full columns) you should download the template file by clicking Download Sample button.
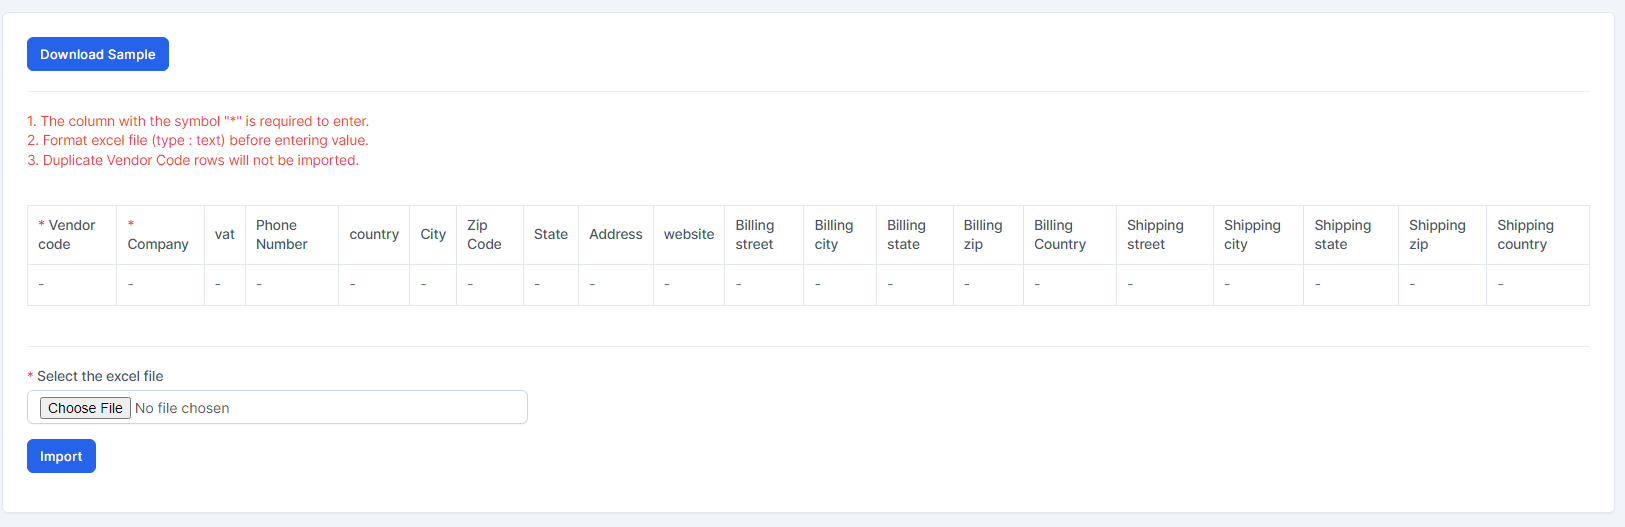
- Step 3. Enter the data you need to import into the downloaded file and save it.
- Step 4. Click the Choose File button under Choose excel file and choose a file -> click on the Import button
- In case the import fails, the Download error file button will be displayed. To see the import error, click Download error file to download the file and see the error
Vendor Detail
- Step 1. Select a vendor and click View.
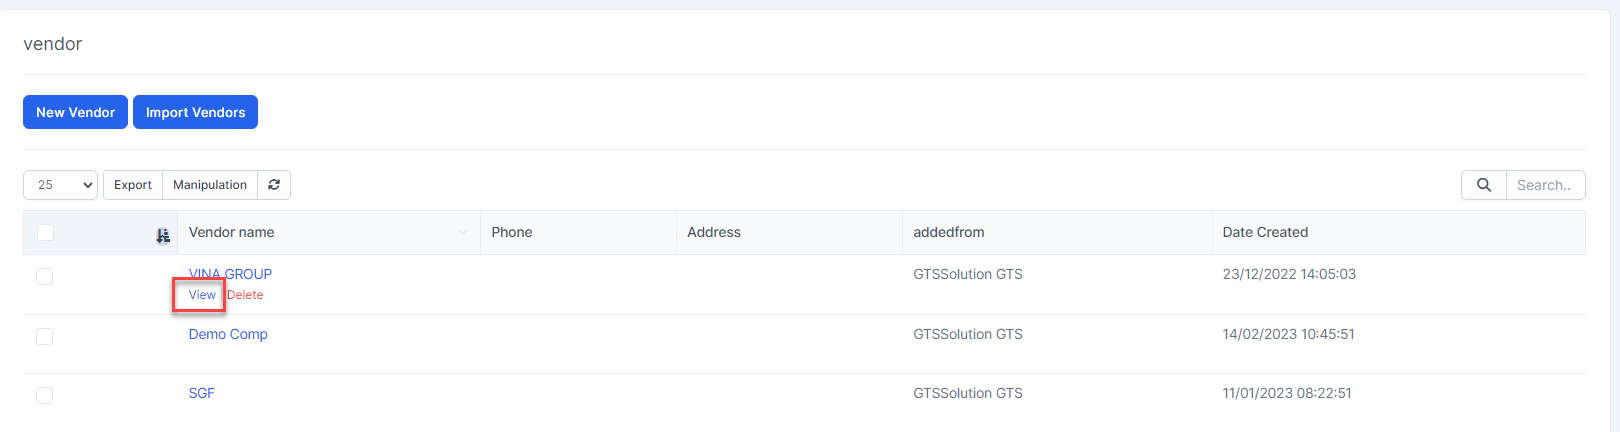
Step 2. This screen is used to view and update vendor information.
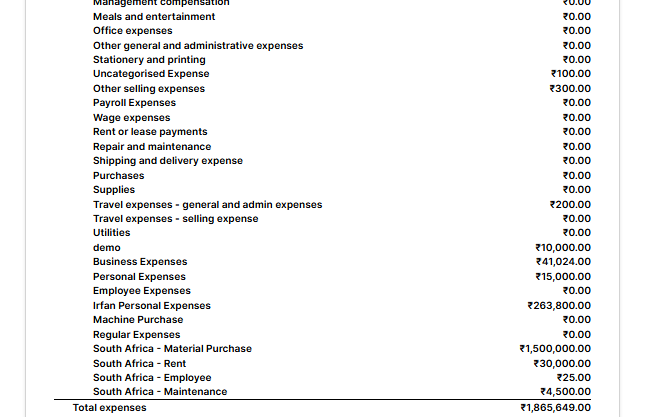
3. HOW TO ADD EXPENSES
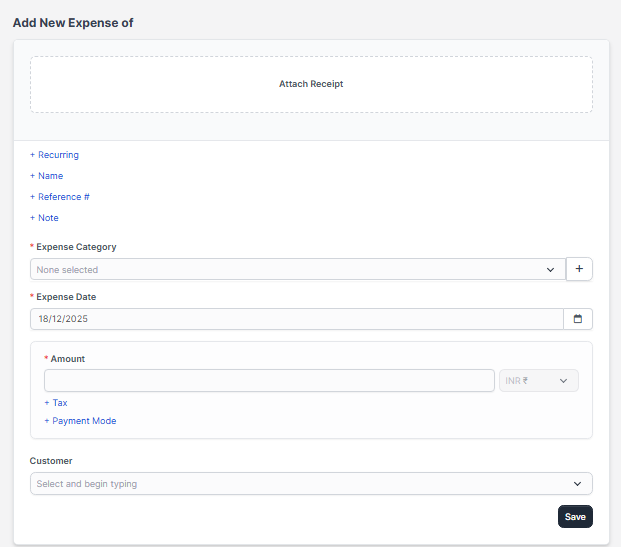
Step 1: Go to expenses menu from the left side panel
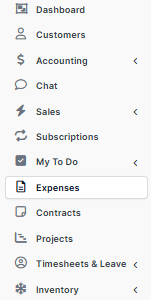
Step 2: Click on Record Expense

Step 3: Fill all the details about the expense in this page and select the category which it belongs to. And Click on Save
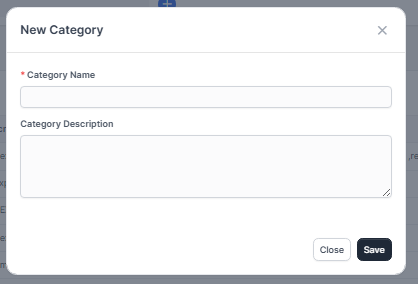
1.How to ADD Expense Category: ( JUST FOR ADDING CUSTOM EXPENSE NEW CATEGORY)
If you are adding new expense category which is not available then you can create it.
Step 1: Go to Setup from the bottom of the panel
Step 2: Click on option Finance from setup panel.
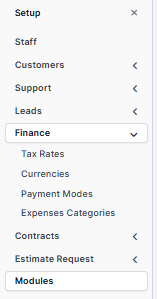
Step 3: Click on Expenses category, then click on New category

Step 4: In new category page fill out all the details.

2. Mapping of Custom Expense Category : ( this is for mapping expense category )
If you want to add a expense categories which are custom other than built-in categories and want to display those categories on reports then follow these steps.
Step 1 : First go to Accounting --> then click on Settings --> Account Detail Types
Step 2 : Click on Add,
Account type : Select account type as Expense.
Name : Write a name of the new custom expense category.
Statement of Cash Flows : Select options from the dropdown.
Description : Add the description(if any), and click Save
3 . : Go to Accounting --> Chart of Accounts

Click on Add
Account Type : Select the Account type as Expense.
Detail Type : Select the detail type which you created.
Name : Enter the name. Click Save.

4. : Go to Accounting
--> Settings --> Mapping Setup
Go to Expense category mapping, and click add.

Add all the details
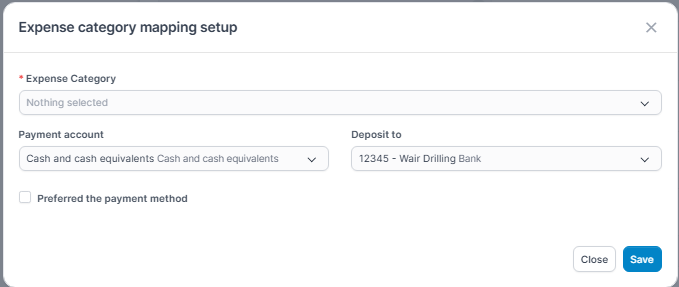
Expense Category : Select the category.
Payment Accounts : Choose the account.
Deposit to : Select the Account from the list. Click Save.
: Go to Expenses Menu --> Click on Record Expense to add expense.

Select the expense category which you created and fill out other details and save it.
Then go to reports under accounting module, click on Profit and Loss report ,and you can see the Customized
Expense Categories.
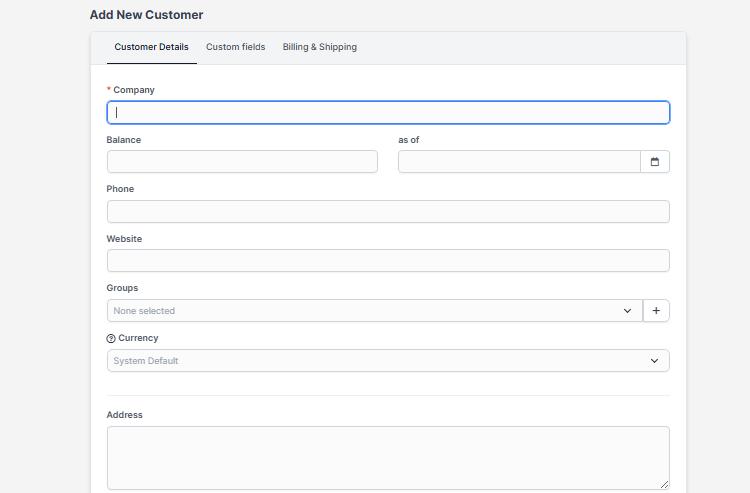
4.HOW TO ADD NEW CUSTOMER
To add new customer, go to customers module from left side panel.
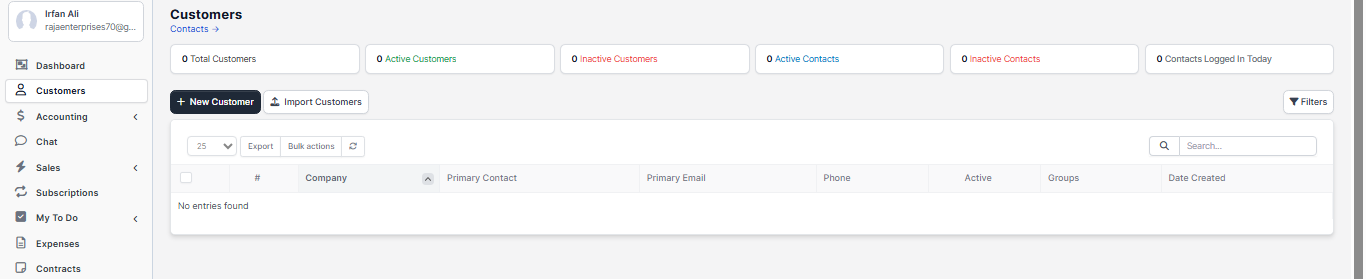
Click on new customer, and fill out all the details about customer.
1.whenever lead confirms the order you can add them as your customer,
2. you can add those who previously purchased from you in customers list ,
3..After adding the customer, you can view the customer and add the necessary things as contact of customers, invoices , projects, tasks etc .
4.whenever you want to create invoice, you must save them in your customer's list, then you are able to send invoice.
5.
5.How to Add task
Step 1: To add task , go to --> Tasks in left side pane.
Step 2: Click on New task.
Step 3: Fill all the details related to task and save it.
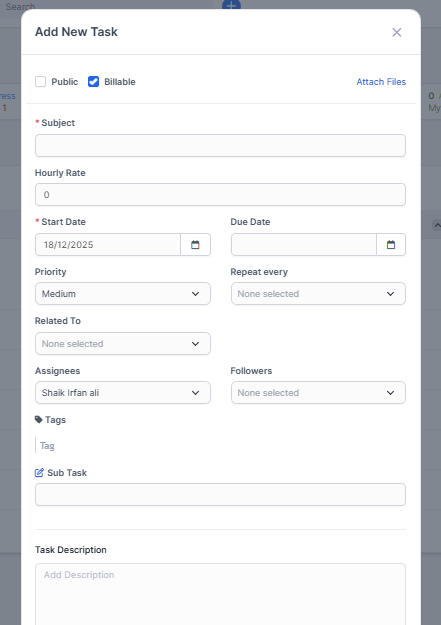
- Write the subject
- Add Start and Due date for task.
- Select the priority of the task.
- Assign the task.
- Add the description of the task
- Fill out all other details.
- And save
6. How to Add Items And Variations in Inventory Module
Add Items
Step 1 : Go to inventory module , click on items, then add item.
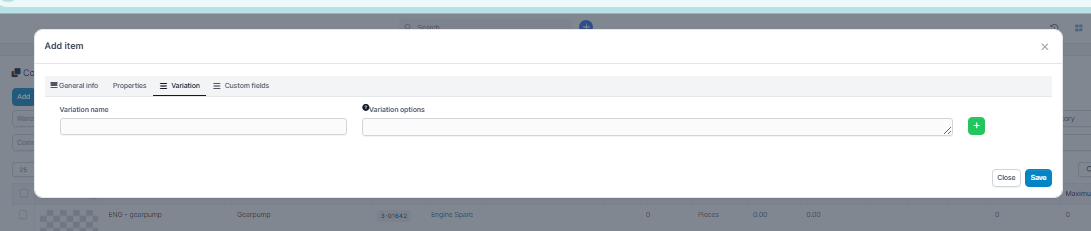
Step 2 : In add item page , add all the details of the items, then go to variations and add the variations if available, then click on save
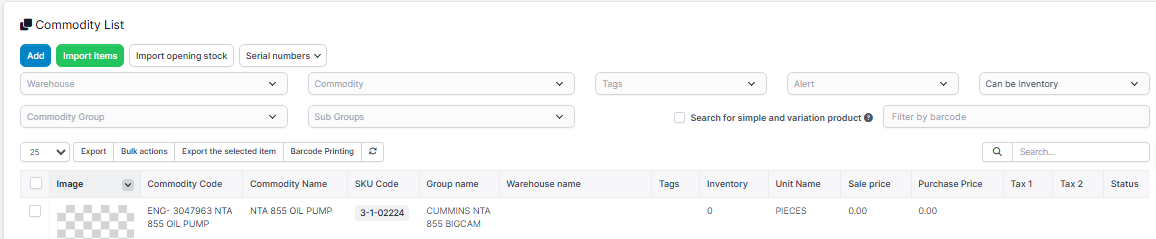
Commodity code - Write the first 3 letters of Commodity group, for example Engine spares as ENG then add the Part name or item name . ( example- ENG- Pushrod valve ,then add same name ( pushrod valve ) in commodity name )
Commodity name - item name or Part name as above mentioned. (pushrod valve )
Description - add description if any
Warehouse - Select the warehouse from the drop down,
Commodity type - Select the commodity type from dropdown if any .( old, new or refurbished- as optional)
Units - Select the units as pieces or sets
Commodity group - Select the commodity group of the item it belongs to from the dropdown.
Default profit rate - add the number as 1% for sample
Tax 1 and Tax 2 - Add the tax rates according to you
Purchase price - Add the price of your item
Sales price - by adding the purchase price , the sales price will get change according to the default profit rate automatically.
Before saving ,
if you have any variations, add the variations in variation tab. if dont have any variations, then click on save .
1.{caution : if you have variations, you must save in starting time only,you cant modify variations after saving it. so either you must do in starting or you must delete the one in whichyou have forgot to add variation and save in new.}
2. { if you want to save variations price, then you have to click search for simple & variation product, -then it will show you variable items- and you can edit and place the price & qty.
if you directly save the price in main product, then it will show the same price for all variables of that product, so for main prduct you can place purchase price as O & then you can add prices in variations if you have }
- To add item details
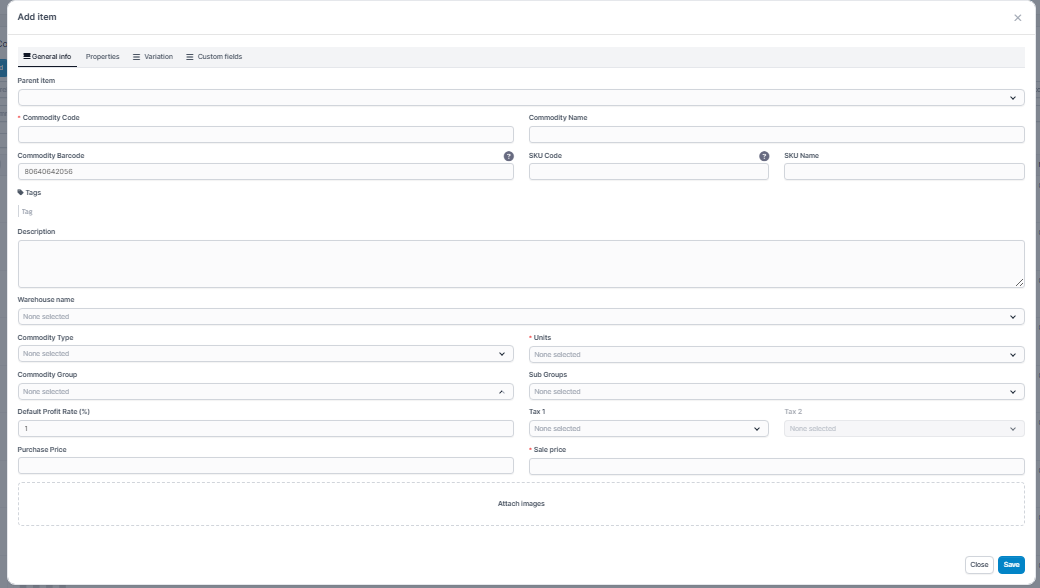
- To add variations
:To add the price for variations,
click on the search for simple and variation products, all the created variations will be visible. Now you can edit to add the prices.
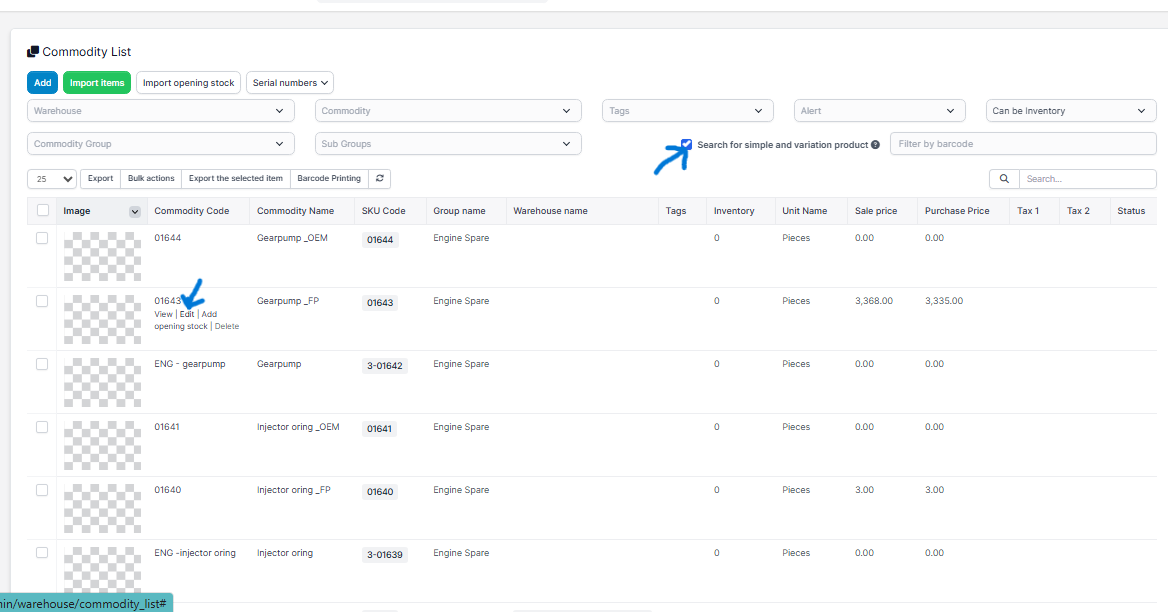
To add the quantity of variations
, hover the item and you will see the add opening stock , click on that and select the warehouse name and add the quantity.

IF YOU ARE ADDING ANY NEW QUANTITY.( THE PRODUCT WHICH IS ALREADY THERE IN STOCK & IF ANY NEW QTY RECIEVED.)
GO TO inventory section - Inventory Receiving Voucher
The Inventory Receiving Voucher is used for:
-
Recording goods received from vendors or suppliers
-
Updating stock levels when items arrive at the warehouse
-
Verifying received quantities against purchase orders
-
Tracking inbound inventory with date, warehouse, and item details
-
Maintaining accurate inventory and audit records
Go to Inventory receiving voucher, and click on add docket , then add the item, warehouse, quantity, price etc, and click on black tick mark and save it .
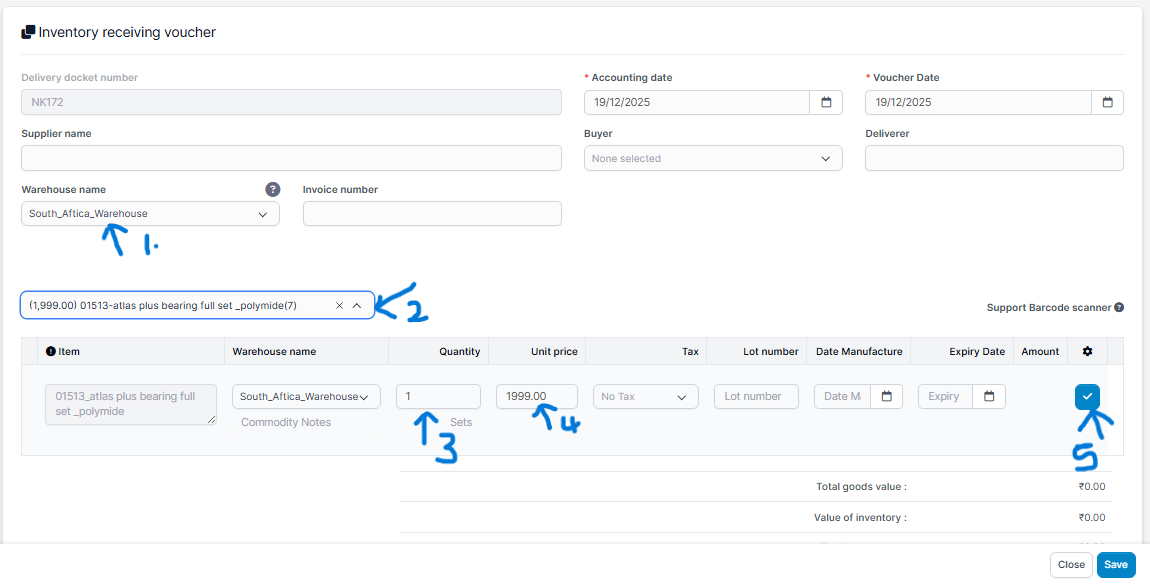
Step1 : Select the warehouse name
Step 2: Select the item
Step 3: Add the quantity
Step 4: Add the price
Step 5: Click on the blue tick to add the item
Step 6: Click on the save
HOW TO SEE MAIN PRODUCT & VARIABLE PRODUCT
If product is visible by product name, then it is main product of the variable item.
if the product is visible by part no. then it is the variable product.
always remember, you must place the main product value as zero, then you can add variable product value..
8.How to Add Items And Variations in Inventory Module
Add Items
Step 1 : Go to inventory module , click on items, then add item.
Step 2 : In add item page , add all the details of the items, then go to variations and add the variations if available, then click on save
Commodity code - Write the first 3 letters of Commodity group, for example Engine spares as ENG then add the Part name or item name . ( example- ENG- Pushrod valve ,then add same name ( pushrod valve ) in commodity name )
Commodity name - item name or Part name as above mentioned. (pushrod valve )
Description - add description if any
Warehouse - Select the warehouse from the drop down,
Commodity type - Select the commodity type from dropdown if any .( old, new or refurbished- as optional)
Units - Select the units as pieces or sets
Commodity group - Select the commodity group of the item it belongs to from the dropdown.
Default profit rate - add the number as 1% for sample
Tax 1 and Tax 2 - Add the tax rates according to you
Purchase price - Add the price of your item
Sales price - by adding the purchase price , the sales price will get change according to the default profit rate automatically.
Before saving ,
if you have any variations, add the variations in variation tab. if dont have any variations, then click on save .
1.{caution : if you have variations, you must save in starting time only,you cant modify variations after saving it. so either you must do in starting or you must delete the one in whichyou have forgot to add variation and save in new.}
2. { if you want to save variations price, then you have to click search for simple & variation product, -then it will show you variable items- and you can edit and place the price & qty.
if you directly save the price in main product, then it will show the same price for all variables of that product, so for main prduct you can place purchase price as O & then you can add prices in variations if you have }
- To add item details
- To add variations
:To add the price for variations,
click on the search for simple and variation products, all the created variations will be visible. Now you can edit to add the prices.
To add the quantity of variations
, hover the item and you will see the add opening stock , click on that and select the warehouse name and add the quantity.
IF YOU ARE ADDING ANY NEW QUANTITY.( THE PRODUCT WHICH IS ALREADY THERE IN STOCK & IF ANY NEW QTY RECIEVED.)
GO TO inventory section - Inventory Receiving Voucher
The Inventory Receiving Voucher is used for:
-
Recording goods received from vendors or suppliers
-
Updating stock levels when items arrive at the warehouse
-
Verifying received quantities against purchase orders
-
Tracking inbound inventory with date, warehouse, and item details
-
Maintaining accurate inventory and audit records
Go to Inventory receiving voucher, and click on add docket , then add the item, warehouse, quantity, price etc, and click on black tick mark and save it .
Step1 : Select the warehouse name
Step 2: Select the item
Step 3: Add the quantity
Step 4: Add the price
Step 5: Click on the blue tick to add the item
Step 6: Click on the save
HOW TO SEE MAIN PRODUCT & VARIABLE PRODUCT
If product is visible by product name, then it is main product of the variable item.
if the product is visible by part no. then it is the variable product.
always remember, you must place the main product value as zero, then you can add variable product value..
9.
9.How to create invoice, Delete invoice
To Create Invoice
To create invoice go to --> Sales --> Click on Invoice

Click on Create invoice -
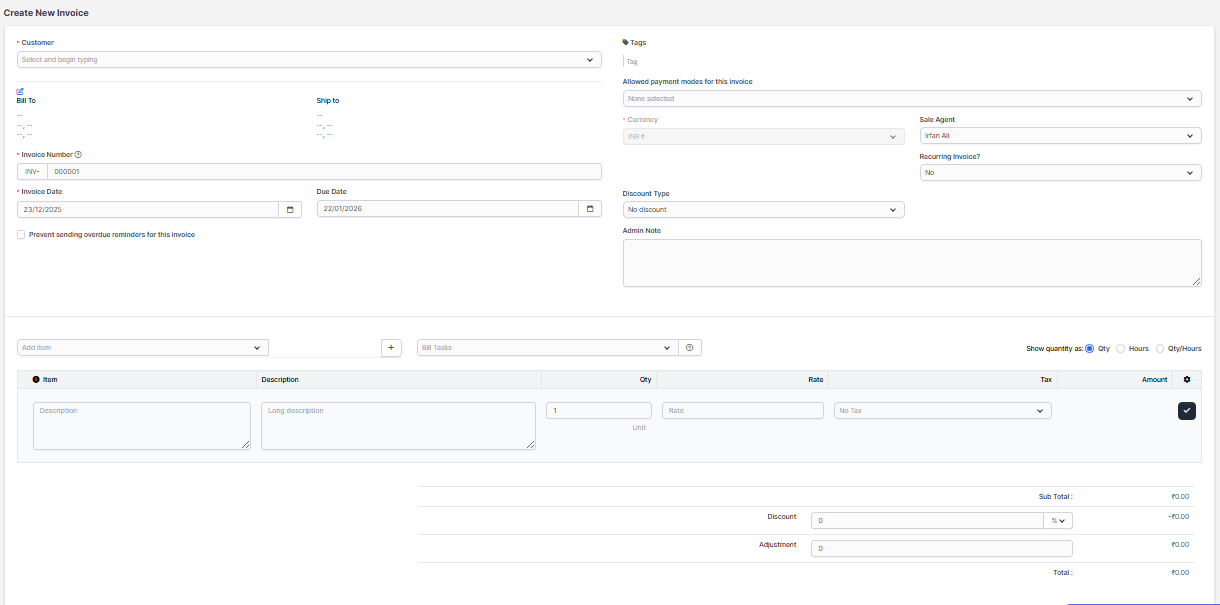
Customer - Select the customer from the drop down
Item -Select the item
Qty - select the quantity
Rate - add the price
Allowed payment modes for this invoice - select the bank account
After adding all the details , click on black tick mark to add the item, and then click on save.
To View Invoice
To view invoice click on view invoice
To Delete Invoice
To delete an invoice click on invoice name for eg. INV - 000015
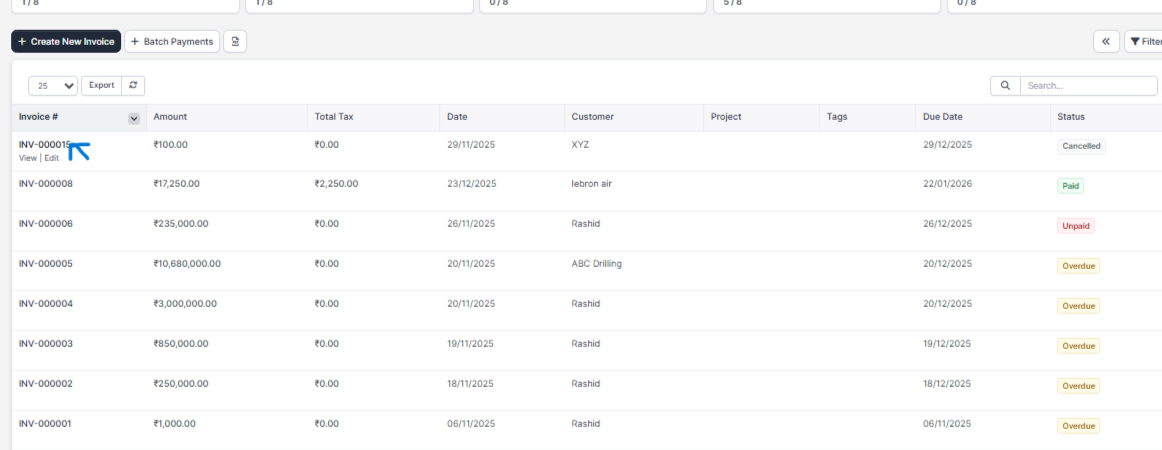

After opening go in more then delete option will be visible then click on delete to delete it permanently
10.
10.How to add Payment mode, tax
To Add the payment mode
Go in setup
In setup click on Finance --> then click on Payment modes 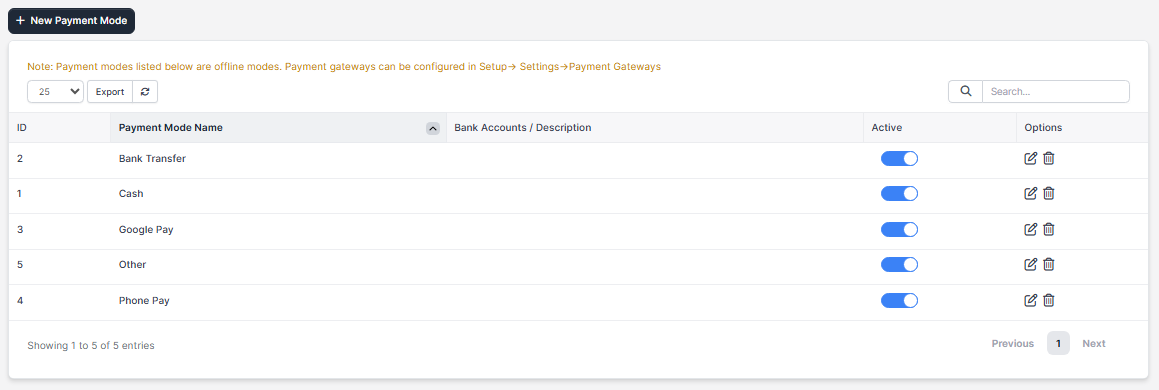
Then click on new payment mode and add the new payment mode
To add the Tax
Go to setup
In setup click on Finance --> then click on Tax rates

11.
To Import Items
Step 1 : Go to inventory module --> Click on Items.
Step 2 : Click on Import Items
Step3 : Click on Download Sample

After downloading the sample .
Fill in all the necessary details as,
Commodity Code - Enter the Commodity name with part name or item name,
Commodity Group - for this go to setting and check the commodity group code like 1,2,3 etc and write that code in place of Commodity Group.
Unit - Same for units write the units code as 1, 2, etc check in settings of inventory
Fill all other details and save the file.
Step 4: In the choose file section choose the file and then import it.
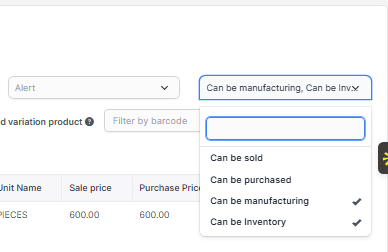
Note -
If you are bulk importing the you check the option at the right as can be manufacturing then only your imported items will be visible
To Import Variations
Step 1 : To import variations , click on download sample
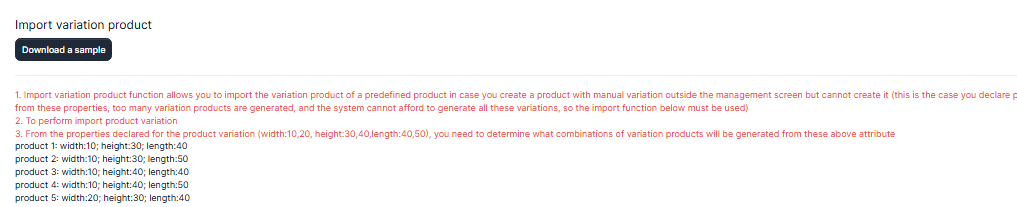 Step 2 : Fill the details in downloaded file as,
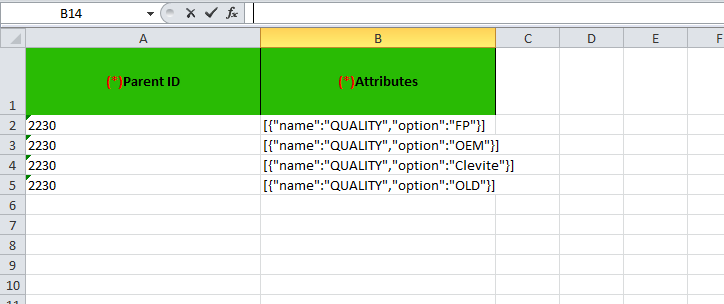
To add the variations for the item-
For parent Id - Go to items list click on view of the item which you want to add the variations.
Click on view . Then on the upper side you will see the parent ID.
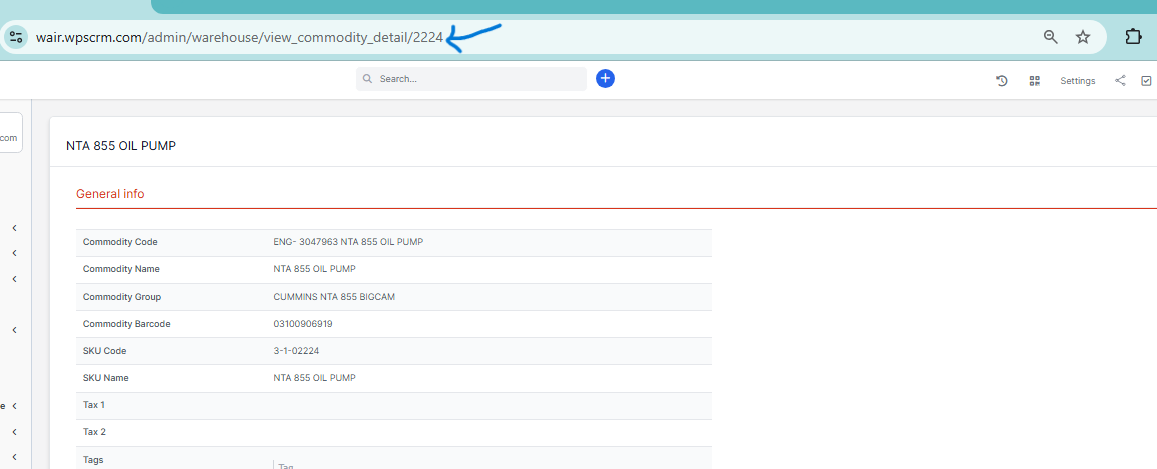
The last digits are the parent id , copy that numbers and paste in parent id column,
In attributes columns add the details, as name : quality and option : FP, etc. In option part write the variation names . Save and Import the file.